Job Setup Wizard
Overview:
The Job Setup Wizard is a guided job creation feature that steps you through the creation of a Job or Sub Job. It can be reached on the Jobs screen using + Create Job or in the case of an existing job, clicking the blue ellipsis button and selecting New Sub Job. All fields in this wizard can be updated after creating the Job using Job Maintenance.
There are several setup items that should be finalised before attempting to create a job, specifically in the Setup Wizard, Work Breakdown, and Jobs Setup sections.
Screen Guide:
Step 1:
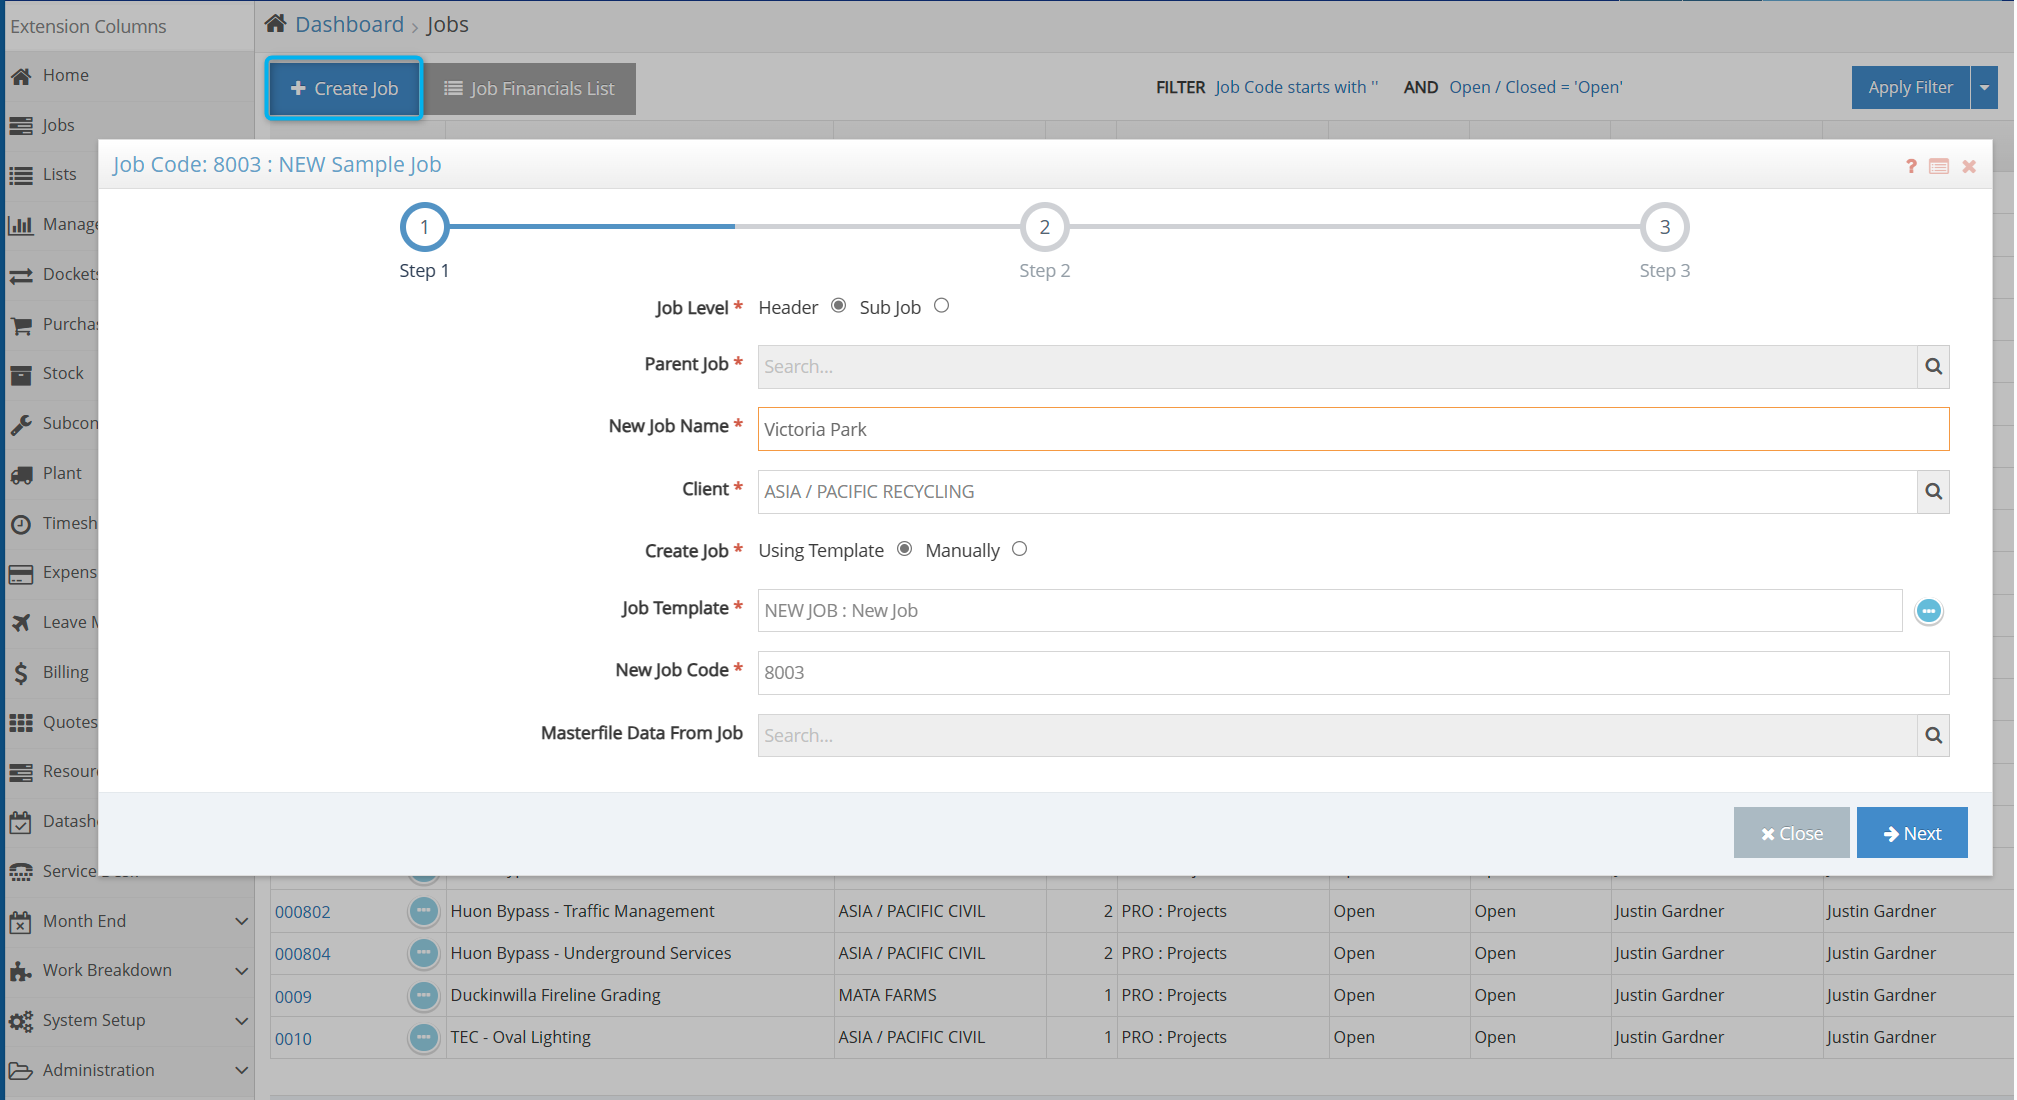
- Job Level can either be Header, which is the default when using the + Create Job button, or Sub Job, which is the default when using New Sub Job. Using the latter will enable the Parent Job field.
- Parent Job is used when the Sub Job level is selected, requiring you to input which job the sub job belongs under. A sub job can be the parent of another sub job, keeping the jobs nested in the intended hierarchy up to 5 tiers deep.
- New Job Name is the custom name given to the job being created. It is not necessary to put a code in this field as that is covered in the New Job Code field. Otherwise, the text can be whatever makes sense for the job, your users, and the client.
- Client is the existing company in Workbench that is marked as a client to which invoices will go to. New companies cannot be created here, but authorised users can create them in Companies, or depending on the integration option, companies may need to be created in the financial software first and pushed into Workbench. Be sure to check with your administrator if you are unsure to prevent duplicate companies from being created.
- Create Job Using Template prompts you to select a pre-existing template created in Job Template List in the Job Template field. Templates greatly speed up job creation by pre-filling fields that do not regularly change from job to job. Selecting Manually will disable the Job Template field, enable the Masterfile Data From Job field, and leave all fields blank in Step 2, allowing for complete customisation of the job from scratch.
- Job Template becomes available when the previous field is set to Using Template. The list will be filtered to the hierarchy level of the Job you are creating, i.e., a level 2 template can only be used for level 2 Sub Jobs. You can manage your templates in Job Template List.
- New Job Code defaults from the Job Template selected, and the code sequence used can be adjusted in Job Template List. Sub Jobs are often coded to add suffixes to increment off of the header Job in order to keep things organised. Job suffixes can also be automatically coded using the Profit Centre settings, and prefixes from the Company's AR/Alpha codes if enabled. Job Codes must be unique in Workbench, but otherwise the Job Code can be manually entered/edited using alphanumeric characters and period (.), dash (-), and underscore (_) characters. Other characters will be considered invalid.
- Masterfile Data From Job becomes available when Manually is selected in the Create Job field. This allows you to select an existing Job that you want to copy all settings from, essentially duplicating it with a New Job Code.
Use x Close to cancel data entry, deleting everything entered, or → Next to continue to Step 2. Most of these fields can be edited later in Job Details View.
Step 2:
The next step is divided into tabs due to the amount of data available for Job setup.
General Tab:
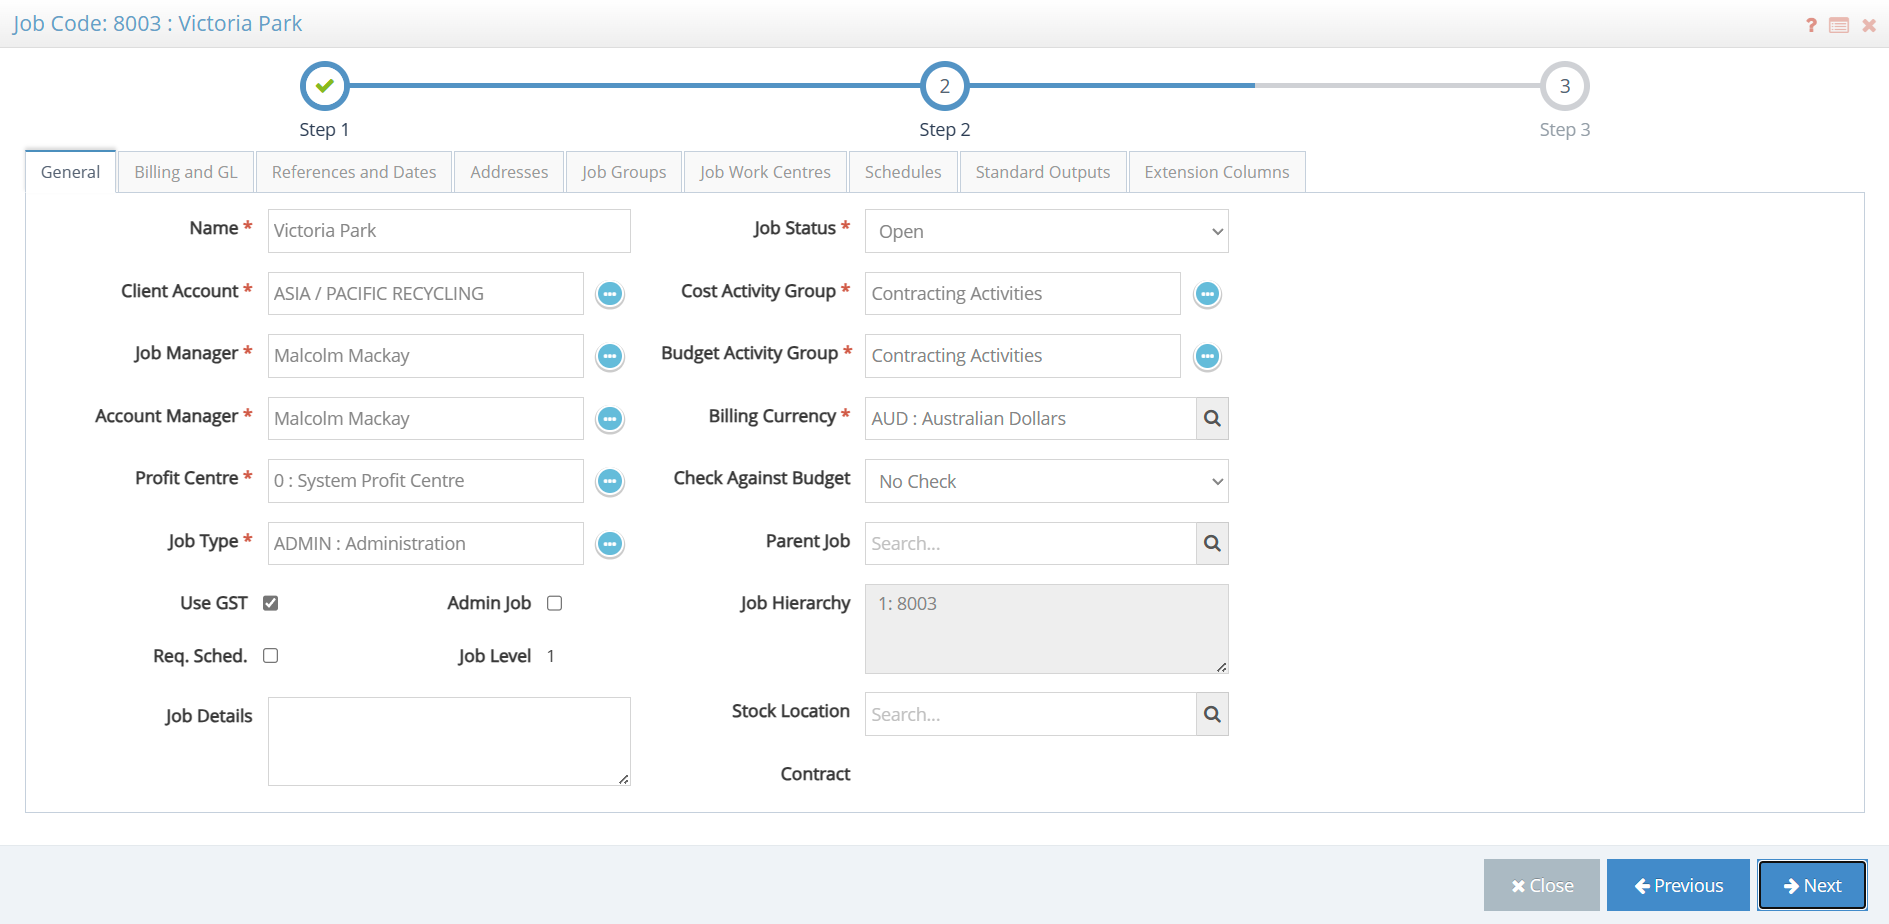
- Name is the New Job Name from the previous step.
- Client Account is the Client from the previous step, but can be updated here if needed.
- Job Manager is the person nominated to be the central manager of the Job. You can set someone as a Job Manager in Users or use the Maintain option from the blue ellipsis button.
- Account Manager is the person nominated to be the manager of the client account for the Job. You can set someone as an Account Manager in Users or use the Maintain option from the blue ellipsis button.
- Profit Centre displays the Profit Centre this Job sits under.
- Job Type is a category that this Job is assigned to. These categories can be used for reporting purposes, and can be maintained using the blue ellipsis button taking you to Job Types.
- Use GST defaults from the Client Account used and enables the appropriate GST Type to be collected on a /wiki/spaces/DARCH/pages/704610336.
- Admin Job is a flag that nominates this job as an administration job. This is used for reporting and filtering.
- Req. Sched. stands for Requires Scheduling, enabling this job to be used with the Datasheet Scheduling module.
- Job Level is the tier or hierarchy that this Job or Subjob was created at and is not editable.
- Job Details is a custom text that can optionally be entered to give more information about the project.
- Job Status allows you to choose from the list of Job Statuses. By default the statuses are Open, Closed, and Invoiced. Note that these statuses are for filtering and coordination, and are different from the Closed and Finalised flags in Job Maintenance.
- Cost Activity Group is the Activity Group you want this Job to use. Activities will be restricted to this list for all /wiki/spaces/DARCH/pages/704675866.
- Billing Currency defaults from the selected Client Account but can be edited to adjust for certain circumstances.
- Check Against Budget has three options to select from:
- No Check - no checks are made against the budget allocation.
- Warn if no budget - will prompt the user that there is no or insufficient budget for the Job/Work Centre/Activity combination they entered in Purchase Orders.
Enforce budget - entry of data in Purchase Orders will be prohibited if there is no budget for the entered line.
There are independent options in Control Parameters for Timesheet budget restrictions. You can change the parameters independently or in conjunction with this Job setting.
- Parent Job is used only when you are creating a Sub Job. This places the new Job within the Job Hierarchy.
- Job Hierarchy displays where the new Job sits in the hierarchy, level 1 being the top level Job.
- Contract will only be populated here in situations where the Contract is determined by the Job Template used. You will have an option in the next step to create a new Contract.
Billing Tab:
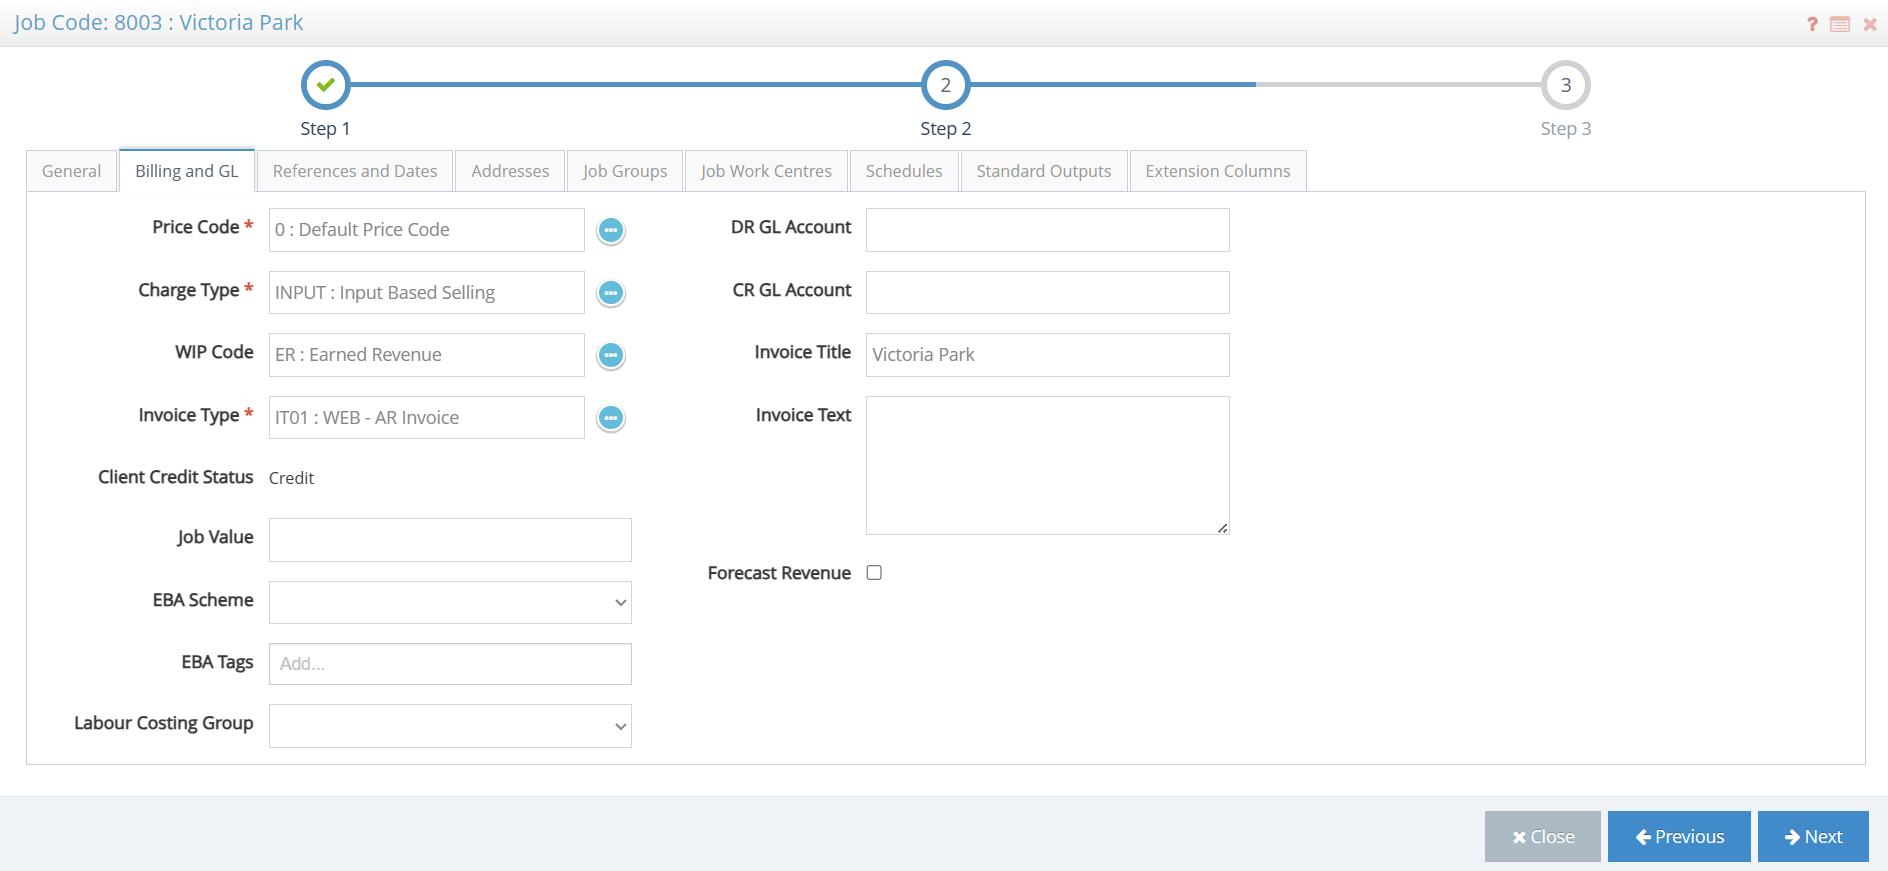
- Price Code is a required field allowing you to set the Price Code for Input Based Selling. Even if your Job does not use this Billing method, an empty code can be used.
- Charge Type determines which Charge Type and subsequently the Billing method you would like to use for your Job Sales Invoices. This determines how you will request money from your client.
- WIP Code uses WIP Codes to determine the calculation for Generating WIP Accruals.
- Invoice Type determines which Invoice Types should be used, changing the display of the Job Sales Invoice document that is sent to the client.
- Client Credit Status is a field that comes from the Companies file of the client, and is for reference only.
- Job Value contains how much the Job is to be billed to the client when using the Quoted Charge Type as it streamlines the billing by pulling this value into the Job Sales Invoice.
- Labour Costing Group allows selection of a Labour Costing Group. These groups change specific Employee Classes to another for this Job and are usually used when you have employees who perform multiple roles and are paid differently for each role. *This field is for backwards compatibility with the Desktop version of Workbench - Labour Costing Groups are not fully available in the Web version and need to be maintained in the Desktop.
- DR/CR GL Account gives you the option of specifying a DR or CR GL Account to post to. Otherwise the Job Sales Invoices will default to the Sales Codes used.
- Invoice Title defaults to the Job Name, but can be edited. This appears on the claim/invoice sent to the Client.
- Invoice Text is blank by default, but can optionally be edited to whatever you or the client needs. This appears on the claim/invoice sent to the Client.
References and Dates Tab:
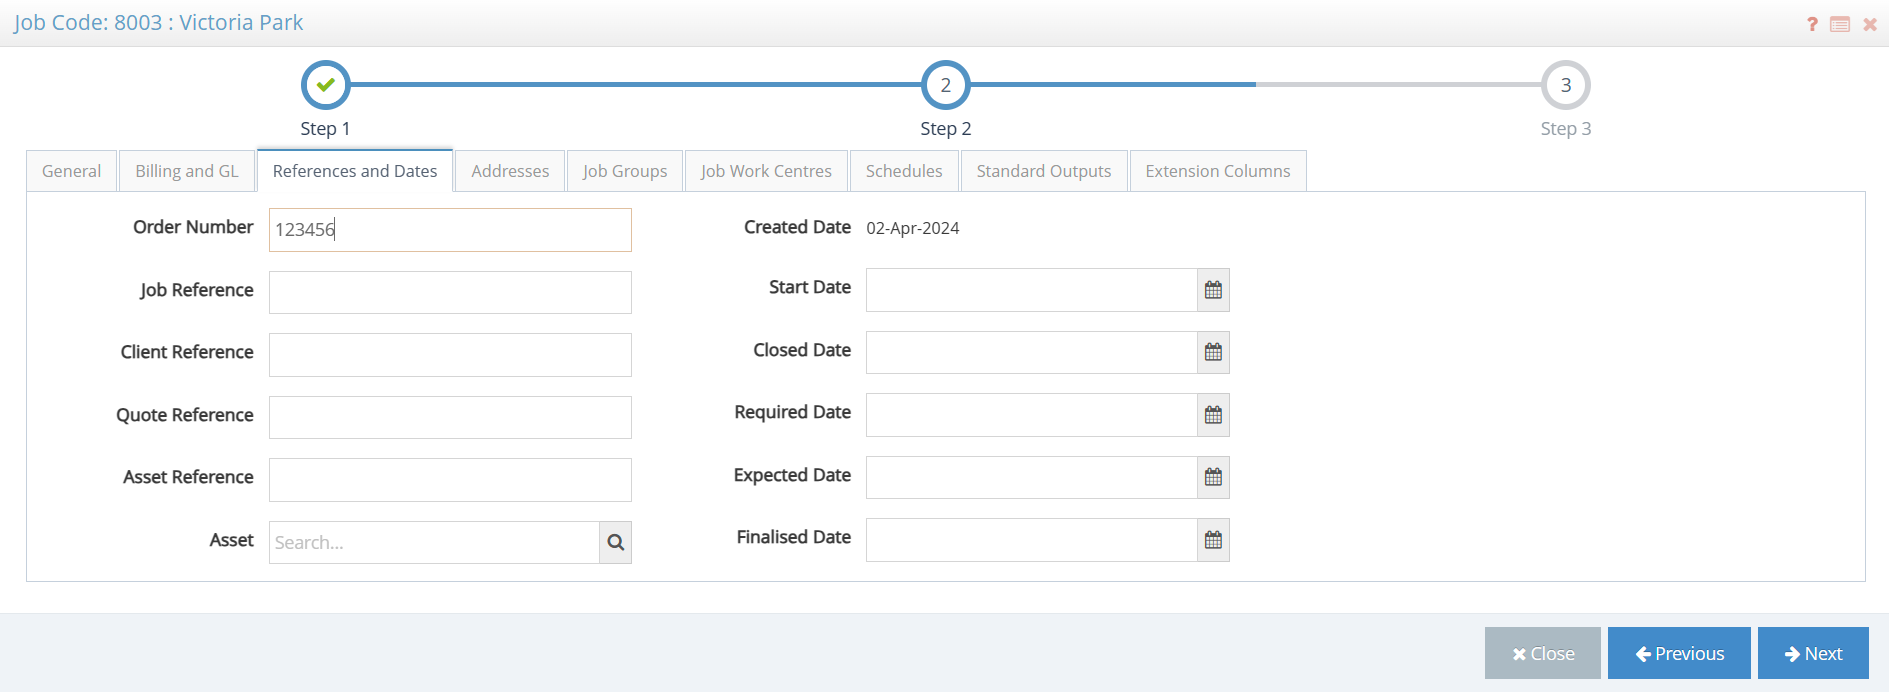
- Order Number is an optional field to place a client Purchase Order number, which will be shown on the claim/invoice and can be updated later.
- Job Reference is an optional field for custom text.
- Client Reference is an optional field for custom text.
- Quote Reference is an optional field for custom text, used for tracking quote numbers given to the client for this Job.
- Date Fields are available for optional use. Note that there are date fields available in Contract Dates to track project-wide dates if a Contract is being used.
Addresses Tab:
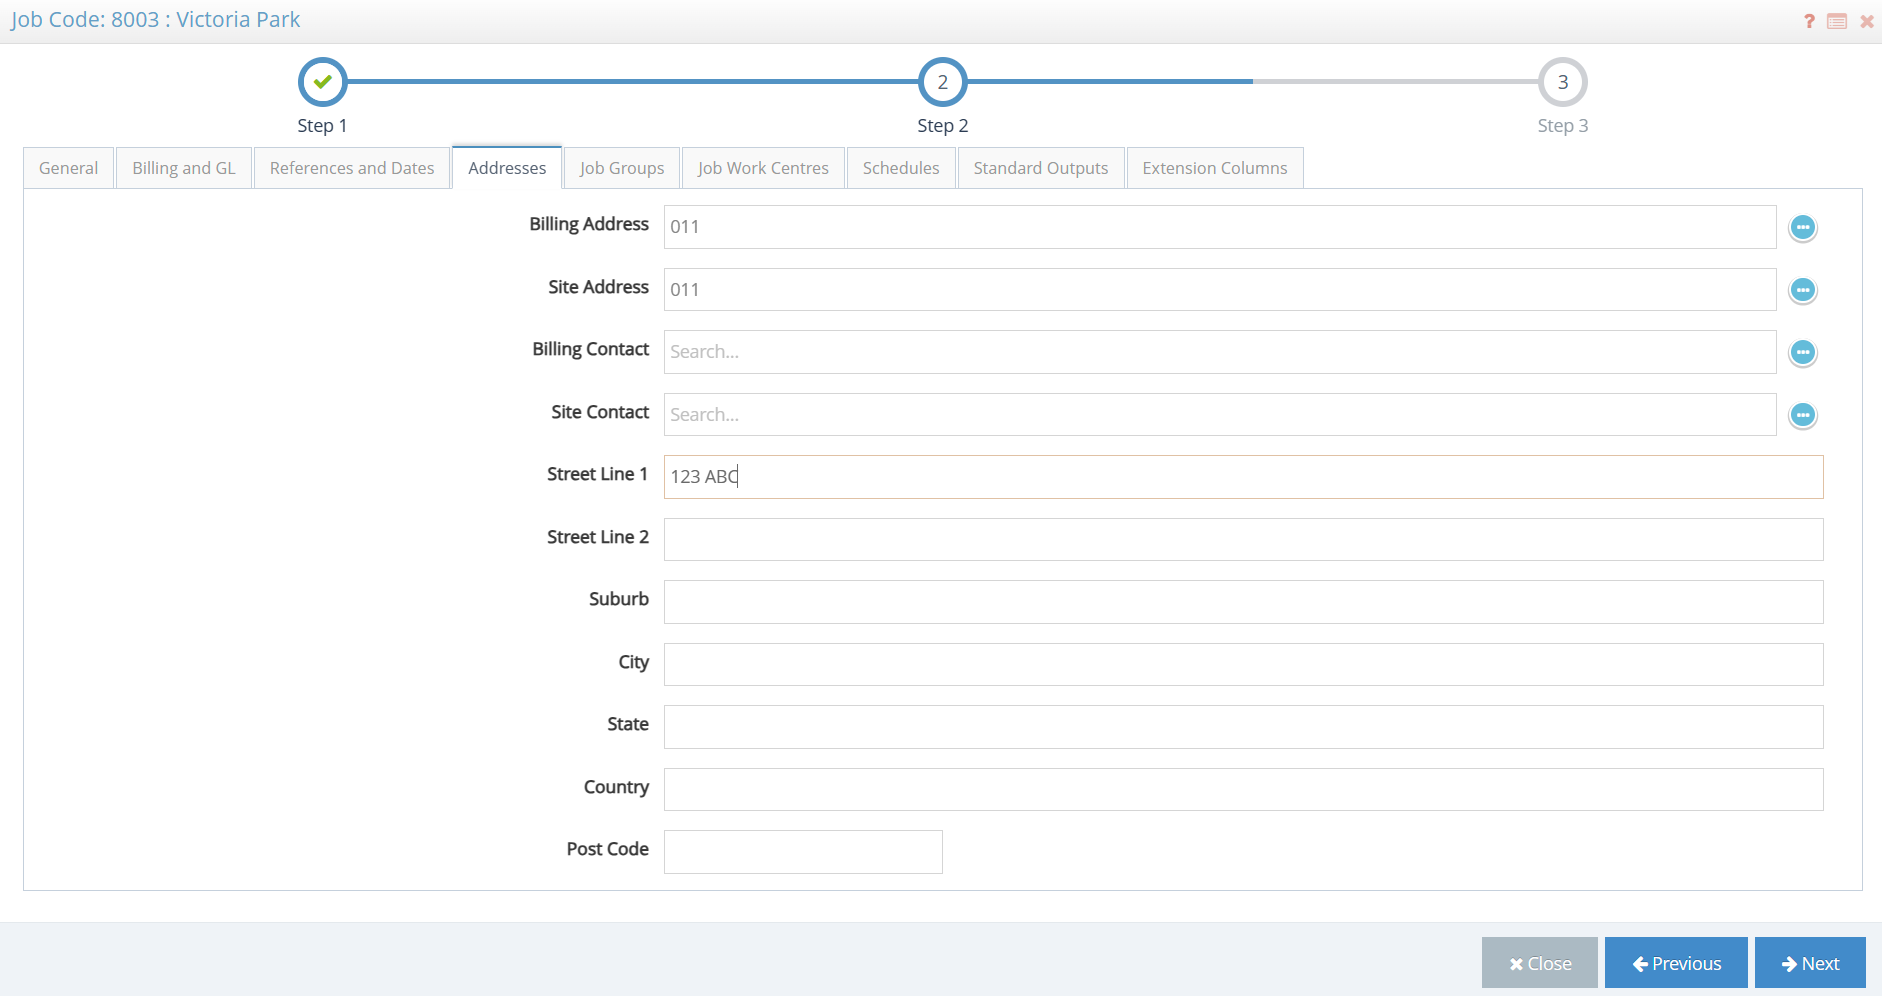
- Billing Address defaults to the Client Company's default billing address, but can be changed here.
- Site Address defaults to the Client Company's default site address, but can be changed here.
- Billing Contact defaults to the Client Company's default billing contact, but can be changed here.
- Site Contact defaults to the Client Company's default site contact, but can be changed here.
- Site Address Details is a custom text field to enter a specific site address or other details.
Job Groups Tab:
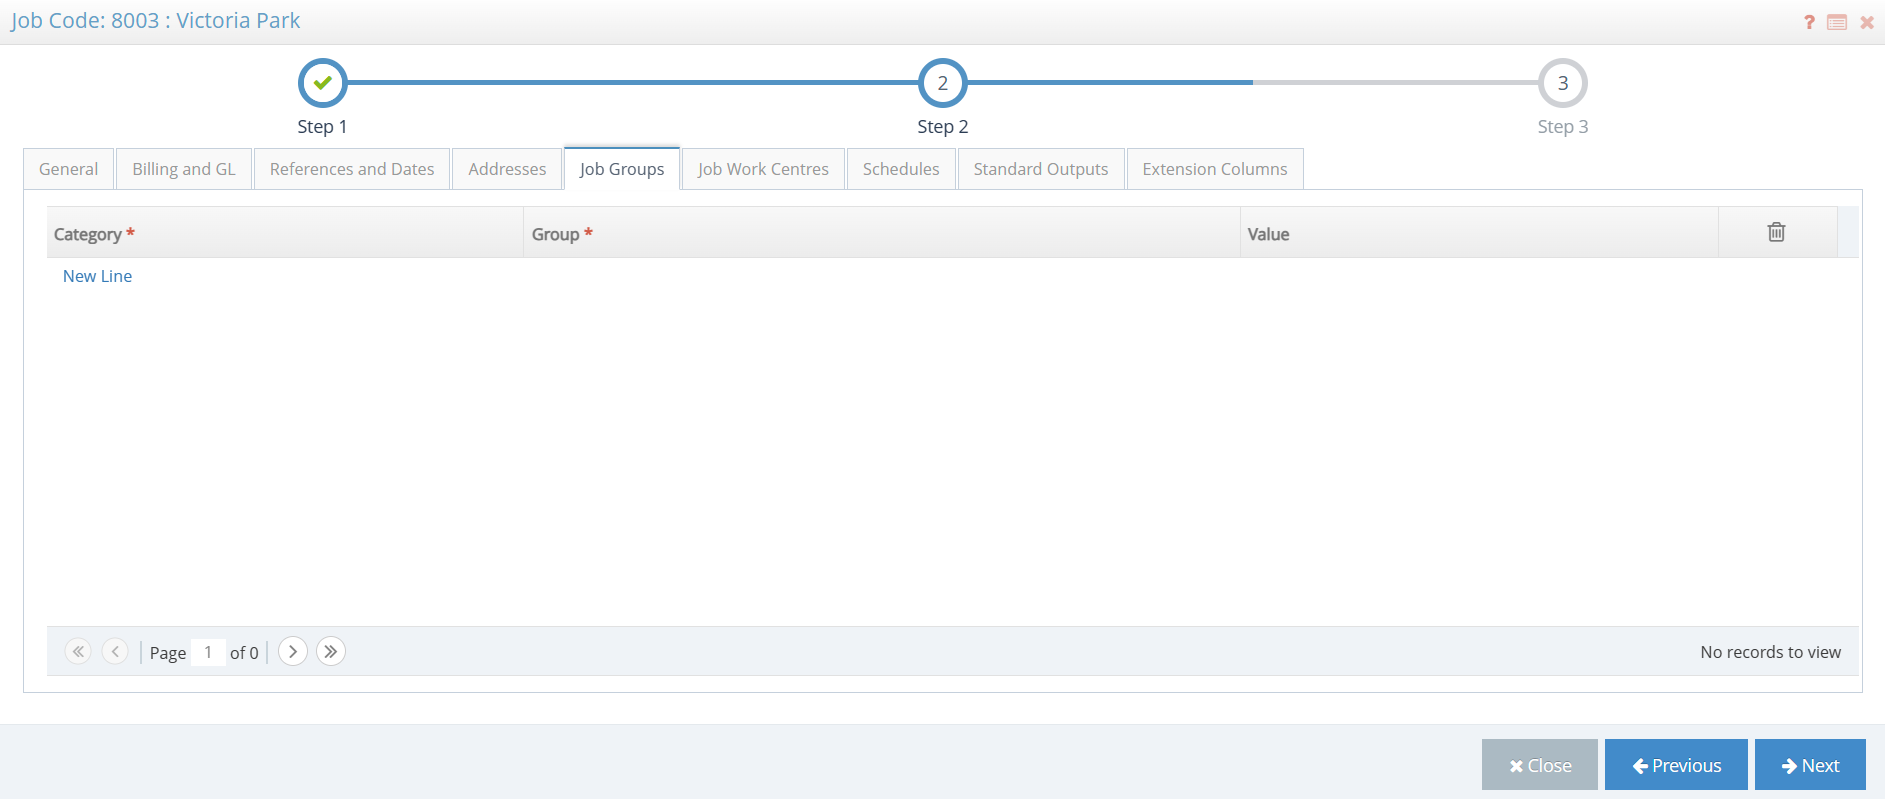
/wiki/spaces/WBJOBCOSTING/pages/43778727 are used to categorise jobs in custom ways that aren't already provided for reporting purposes. These are optional and can be updated independently at a later time.
- Category is the overarching Group Category for this job.
- Group is the Job Group you wish to apply to this job.
- Value is an optional free text value given to this categorisation.
- You can add additional lines using the New Line link, or delete mistaken or incomplete entries by ticking the Bin checkbox.
Job Work Centres Tab:
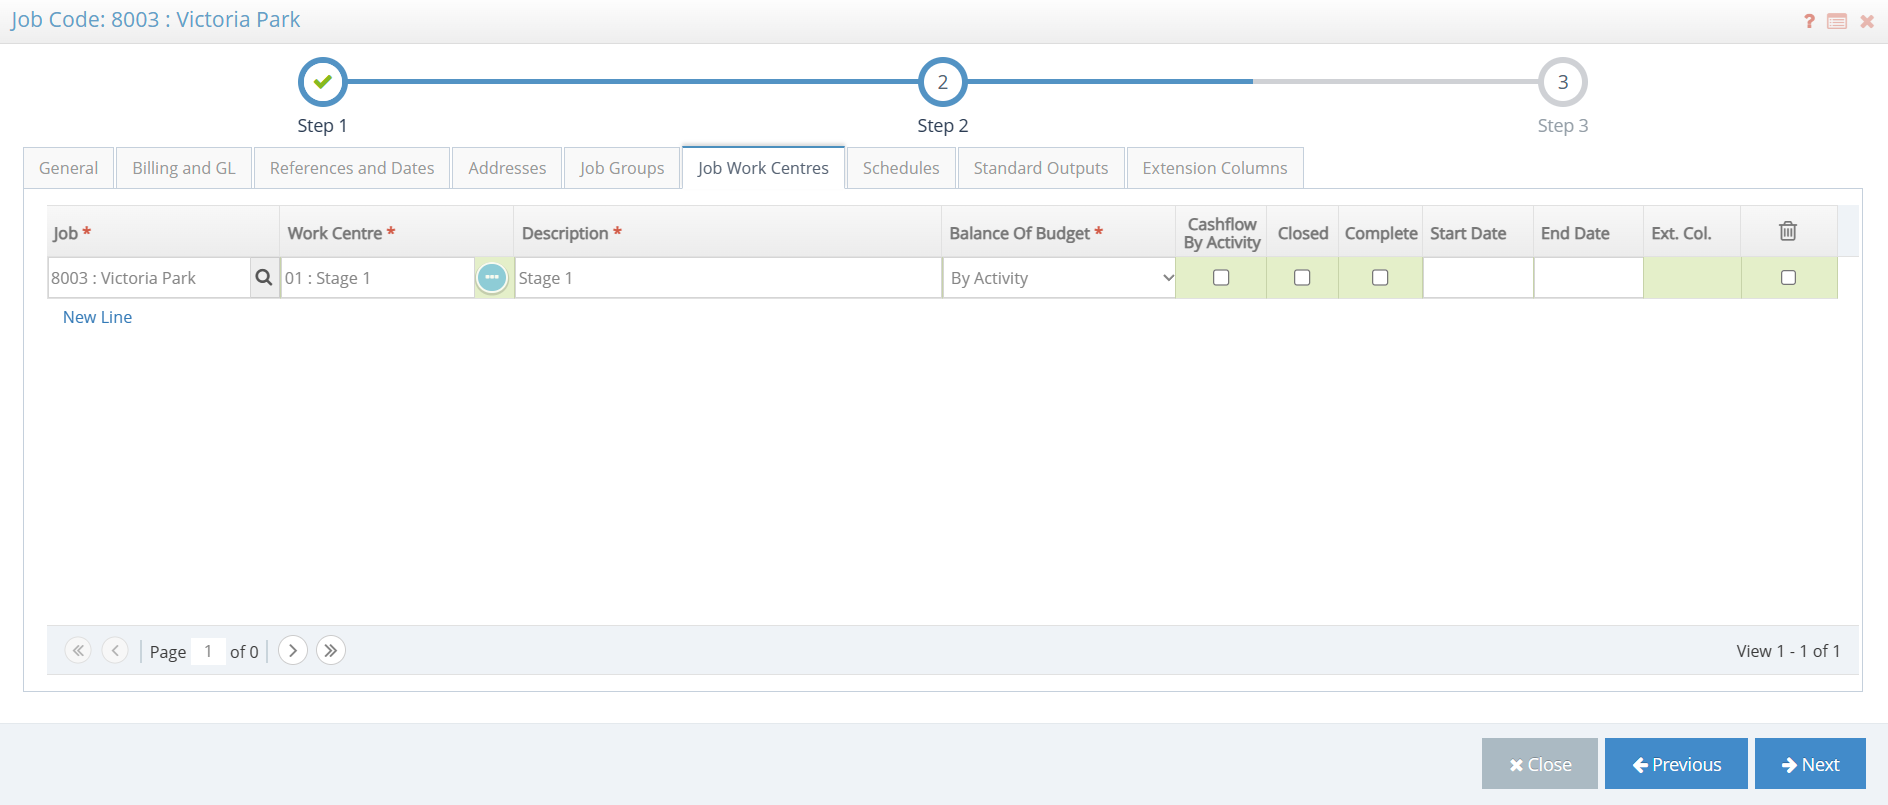
Job Work Centres are ideally set up using a Job Template to prevent adding standard Work Centres. If you mistakenly create a New Line, simply tick the Bin checkbox. You can delete unneeded Job Work Centres loaded through the template by ticking the Bin icon as well. Work Centres can be updated after job creation and throughout the lifetime of the project using Job Maintenance View.
Schedules Tab:
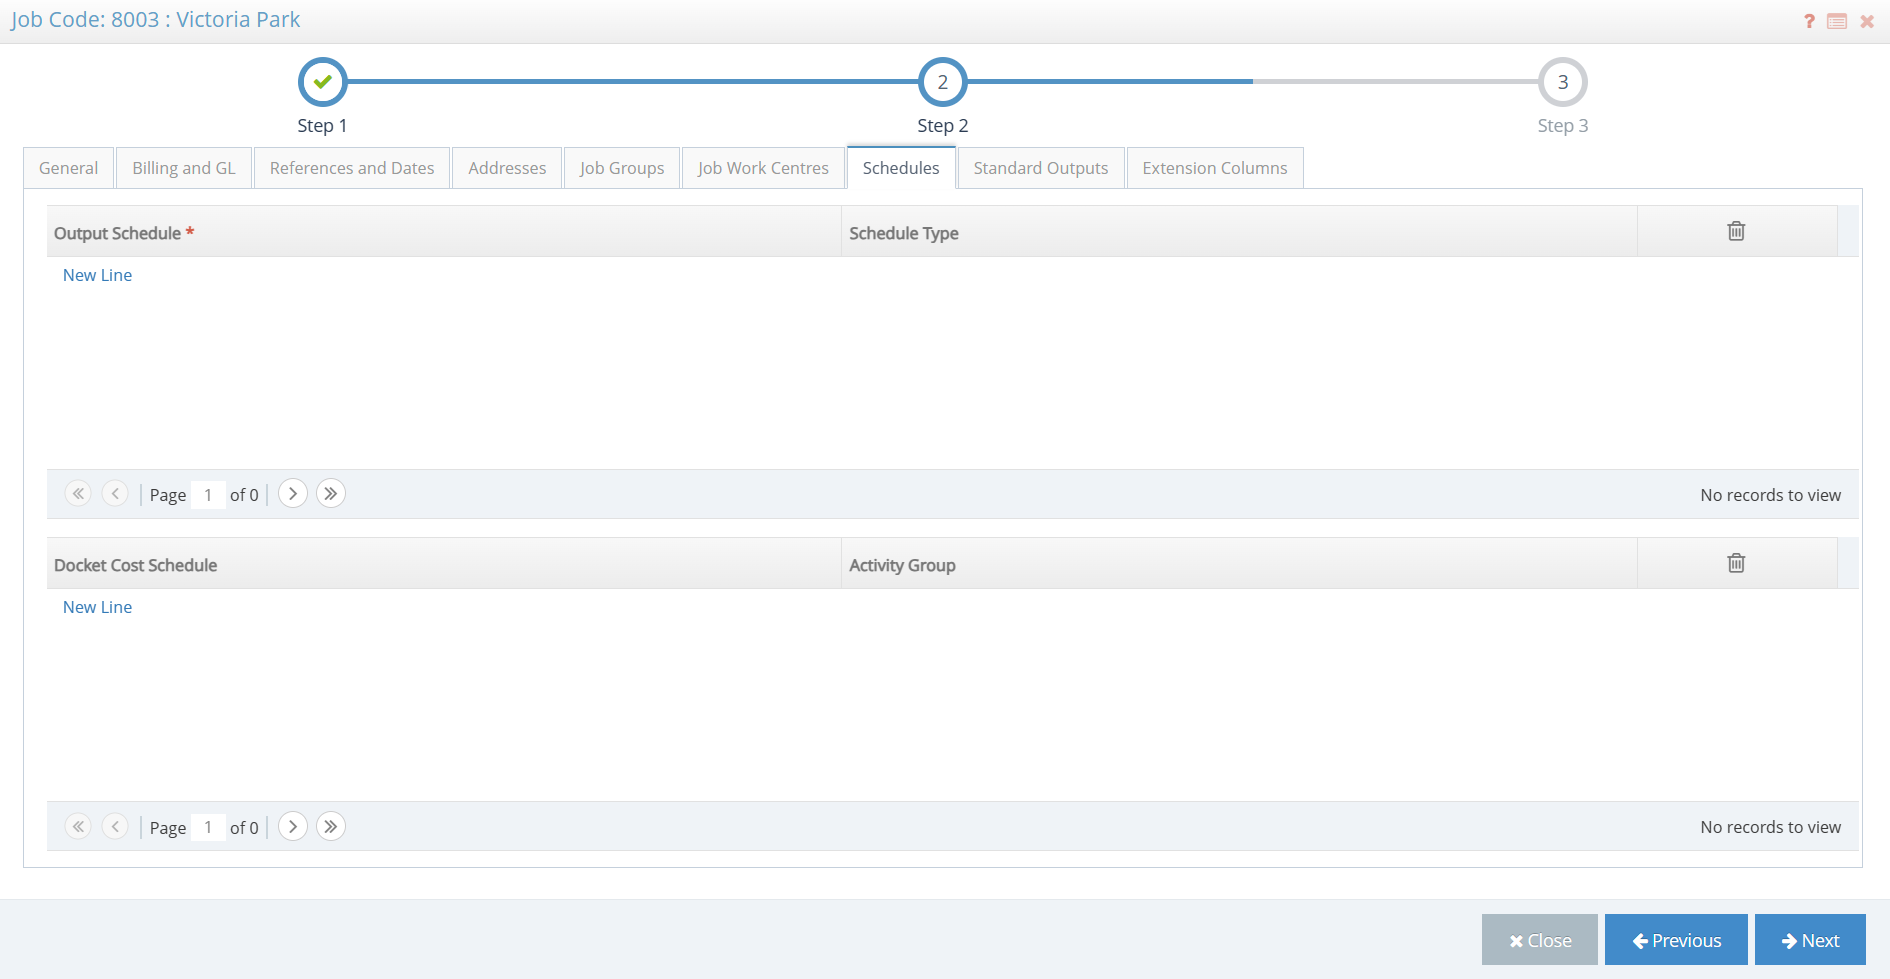
- Output Schedule is a field where you can add one or more Output Schedules to this Job, allowing for Job Outputs Entry and Output Based Billing. Schedules must exist already to be entered here, but can always be added later in Job Maintenance.
- Docket Cost Schedule is used for Docket Cost Schedules and enables Dockets Only Entry entry. Schedules must exist already to be entered here, but can always be added later in Job Maintenance.
Standard Outputs Tab:
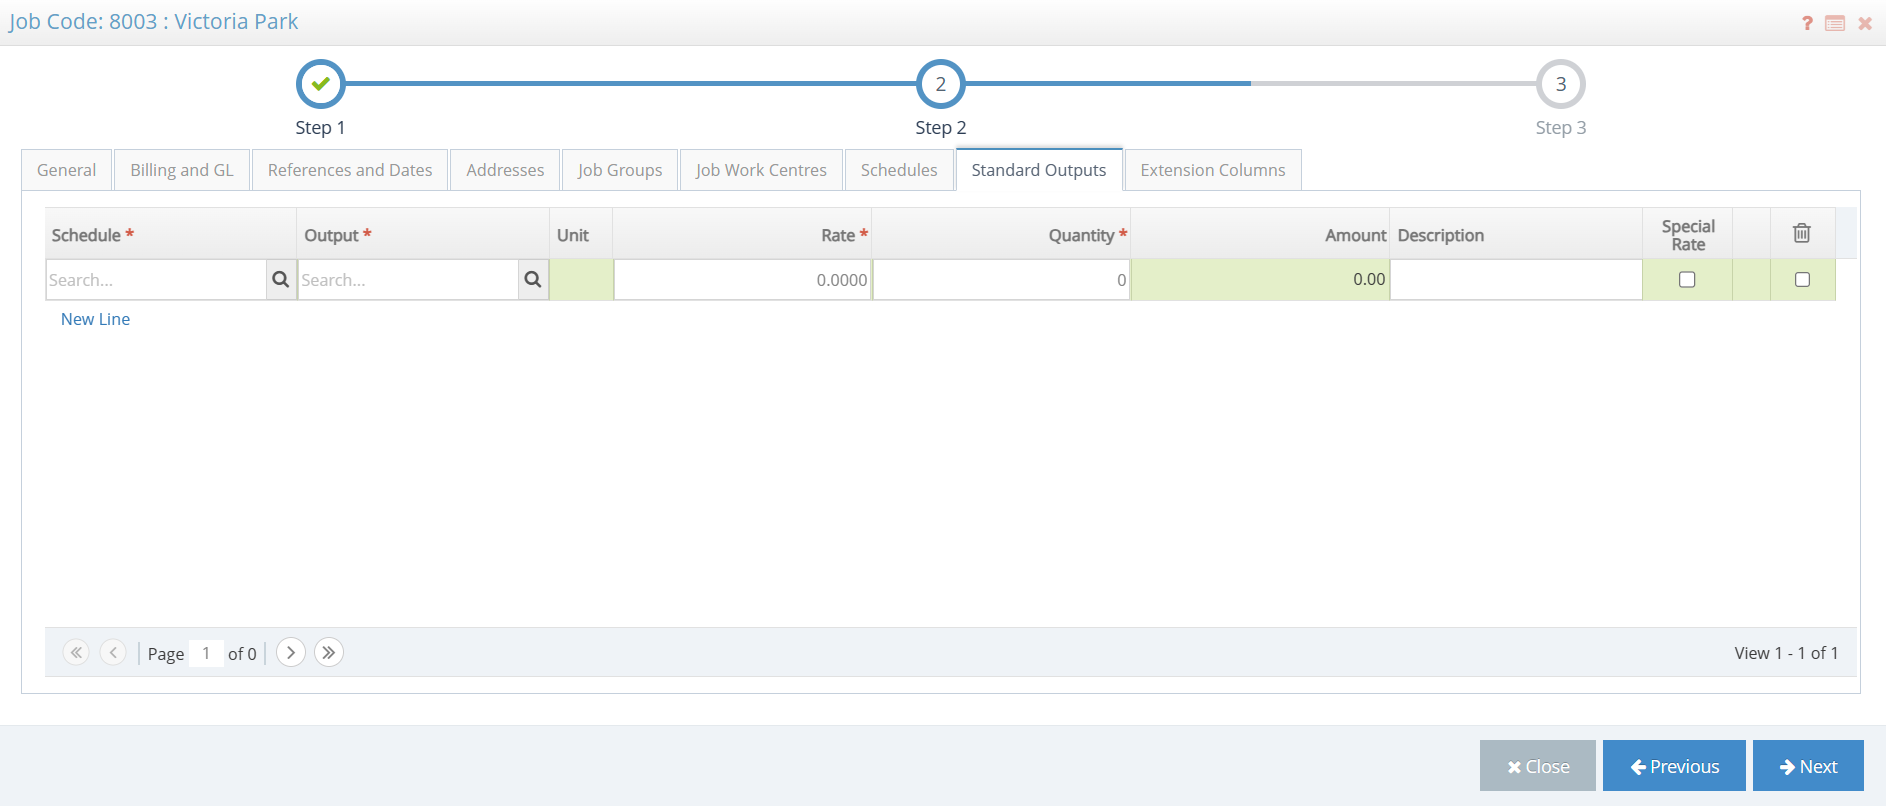
- Outputs lines: Optional job outputs.
Extension Column Tab:
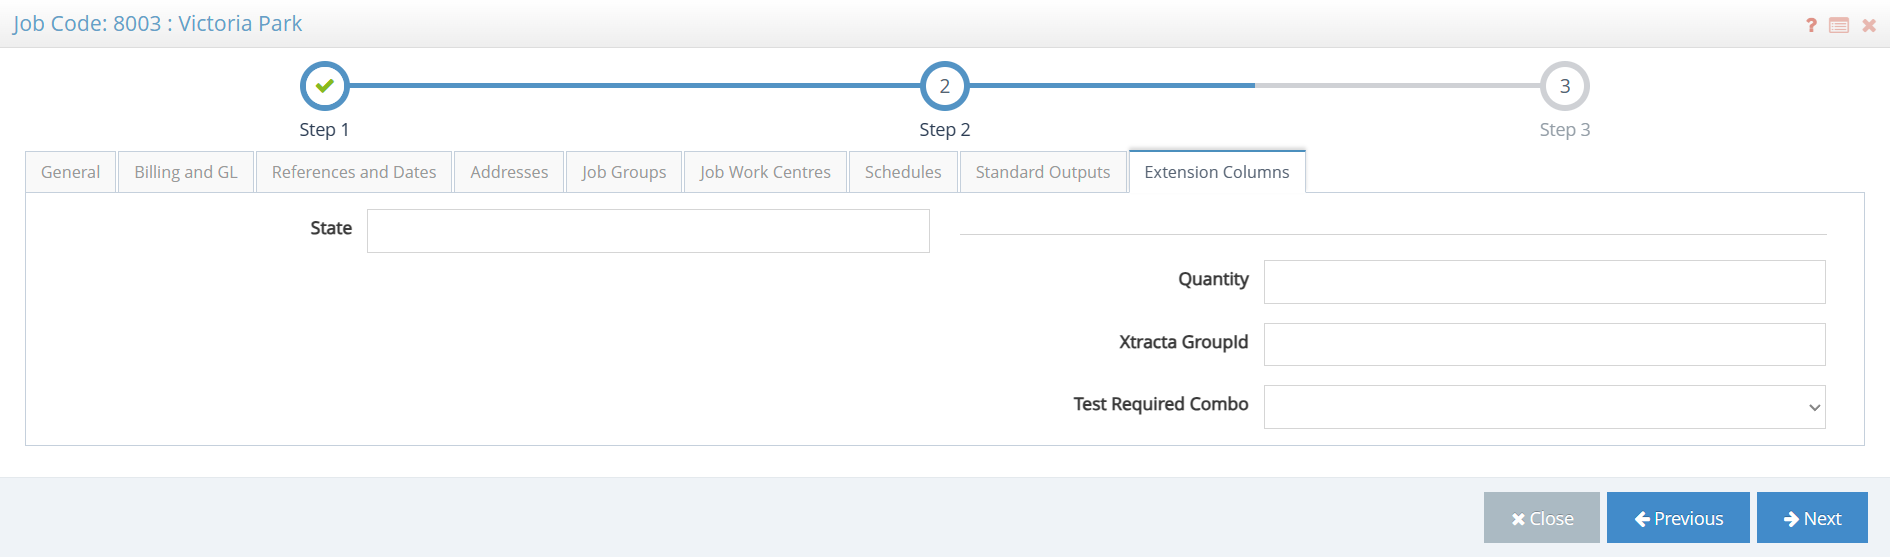
- Display Job Extension Columns value(s).
Step 3:
For this step, there is the single question of whether this Job has a Contract. Remember, this question is not asking about a written contract, but rather whether you would like to utilise Workbench's Contract module. This opens up options like Contract Forecast and Contract Cashflow, automatic retention control, Contract Progress Claims, etc.
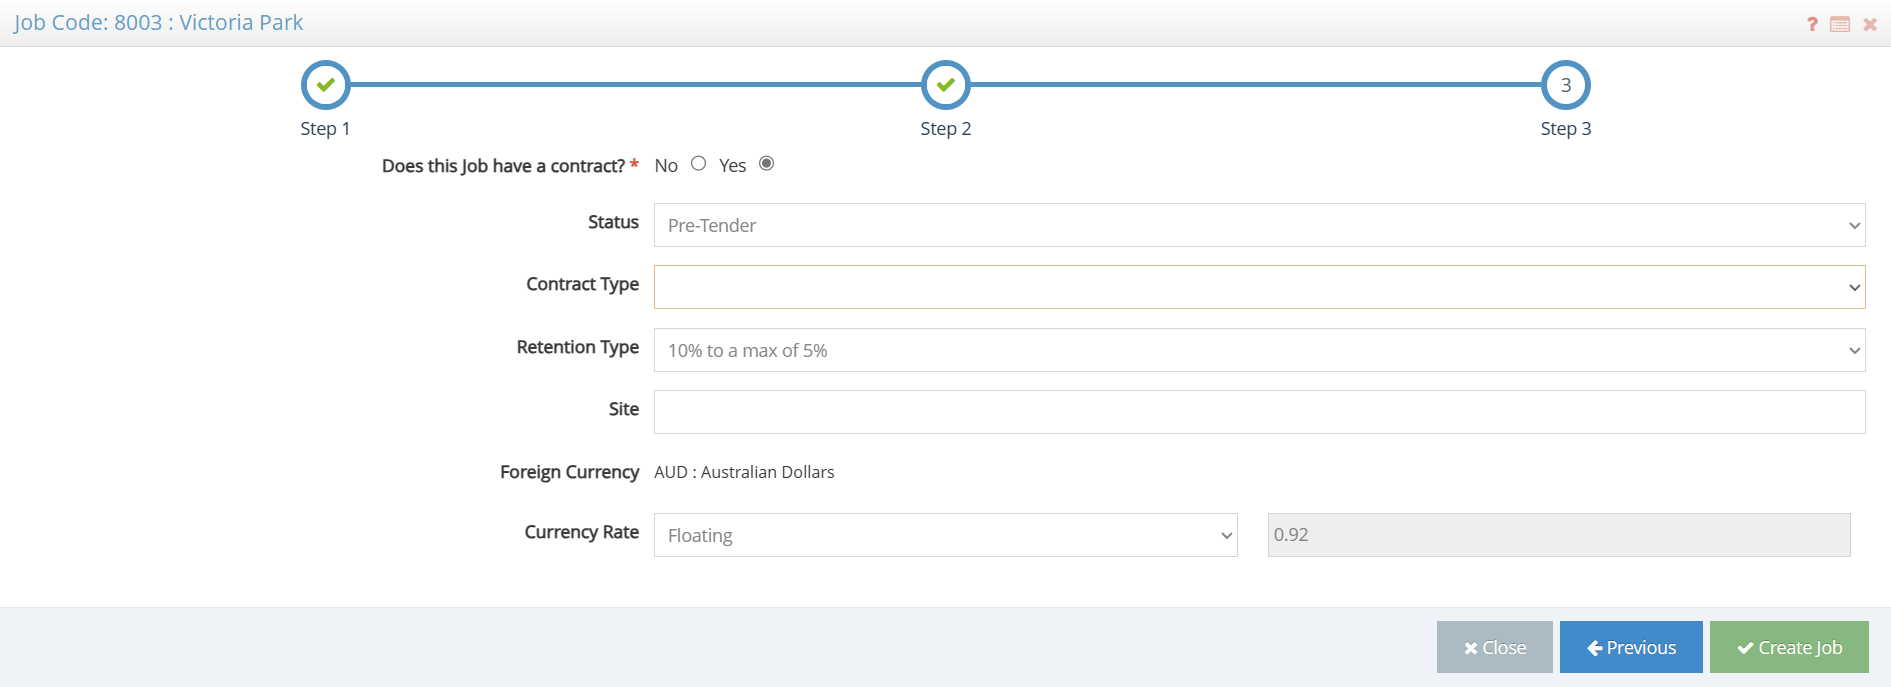
If your answer to the question "Does this Job have a contract?" is no, simply click the Create Job button to finalise the Job Wizard.
If your answer is yes, you are presented with the following fields (which can be updated later in Contract Settings):
- Status is for reference only and does not affect data elsewhere.
- Contract Type is another reference field, and new types can be added in Contract Types.
- Retention Type is required, even if there are no retentions being held - this should be set to the default "No Retentions." New retention types can be added in Retention Codes.
- Site is an optional reference field, usually used for the site name of the project.
- Foreign Currency defaults to the currency of the Job set in Step 2, General Tab.
- Currency Rate can be set to Floating or Fixed, and is only utilised if using Foreign Currencies. Floating means that the conversion will change based on the Currencies table, while Fixed allows you to set a fixed exchange rate for the life of the project.
- Non Contract Billing can be set to No (no invoices can be created outside of the Contract Claims function), Yes, with/without warning (creating Job Sales Invoices outside of the Contract module, potentially to other clients, is allowed).
Once you are satisfied with the settings, click Create Job. If there are any issues with the data, an error will be displayed in red at the top of the screen. Utilise the Previous button to fix any data errors.
Note that even after ticking the Bin checkbox on a line you wish to delete, you may need to change to a different tab before being able to click Next again.
Next Steps:
Your Job is now created; you can edit any of the fields from the wizard using Job Maintenance or Contract Settings. Contract Work Centres is a great place to finalise your Work Centre setup if using Contract Reports.
FAQs:
Filter by label
There are no items with the selected labels at this time.
Process Flow: