Overview:
Depending on your specific internal processes and Job setup, common uses of Service Logs could be:
Service Logs are created by a back-office person who allocates them to an employee who will perform the work and record all costs involved in delivering that work. This employee could invoice the Log once it has been completed, right from the Log. Or the invoicing could be done by a back-office employee once the work has been completed.
A mechanic at the workshop creates Service Logs to record any maintenance or fixes performed on a Plant Item.
Another common scenario would be in those cases where there are very small jobs done for different clients, that do not have a specific Job Code set up for it in Workbench, but rather a generic/catch-all Job for Small Jobs, where the Client could be the Internal company. The Service Log can be created against this ‘Small Jobs' generic Job code, and the particular Client selected in the Log to indicate who the work is being done for and to be able to invoice it to them. Typically, the work will be done and invoiced by the allocated person from the Service Log itself. Detail of billing of 'Small jobs’ can be found here.
Log statuses
| Anchor | ||||
|---|---|---|---|---|
|
A Service Log has three types of the status:
Process Status: Pre-defined stages indicating the progress of the Service Log. The sequential order may vary based on the setup of Jobs.
The billing status: A status aiding in determining the billing stage. Further insights can be found in the Log billing article.
The workflow status: An automatically generated value reflecting the combination of the log's status and its billing status. It dynamically updates with billing or processing changes.
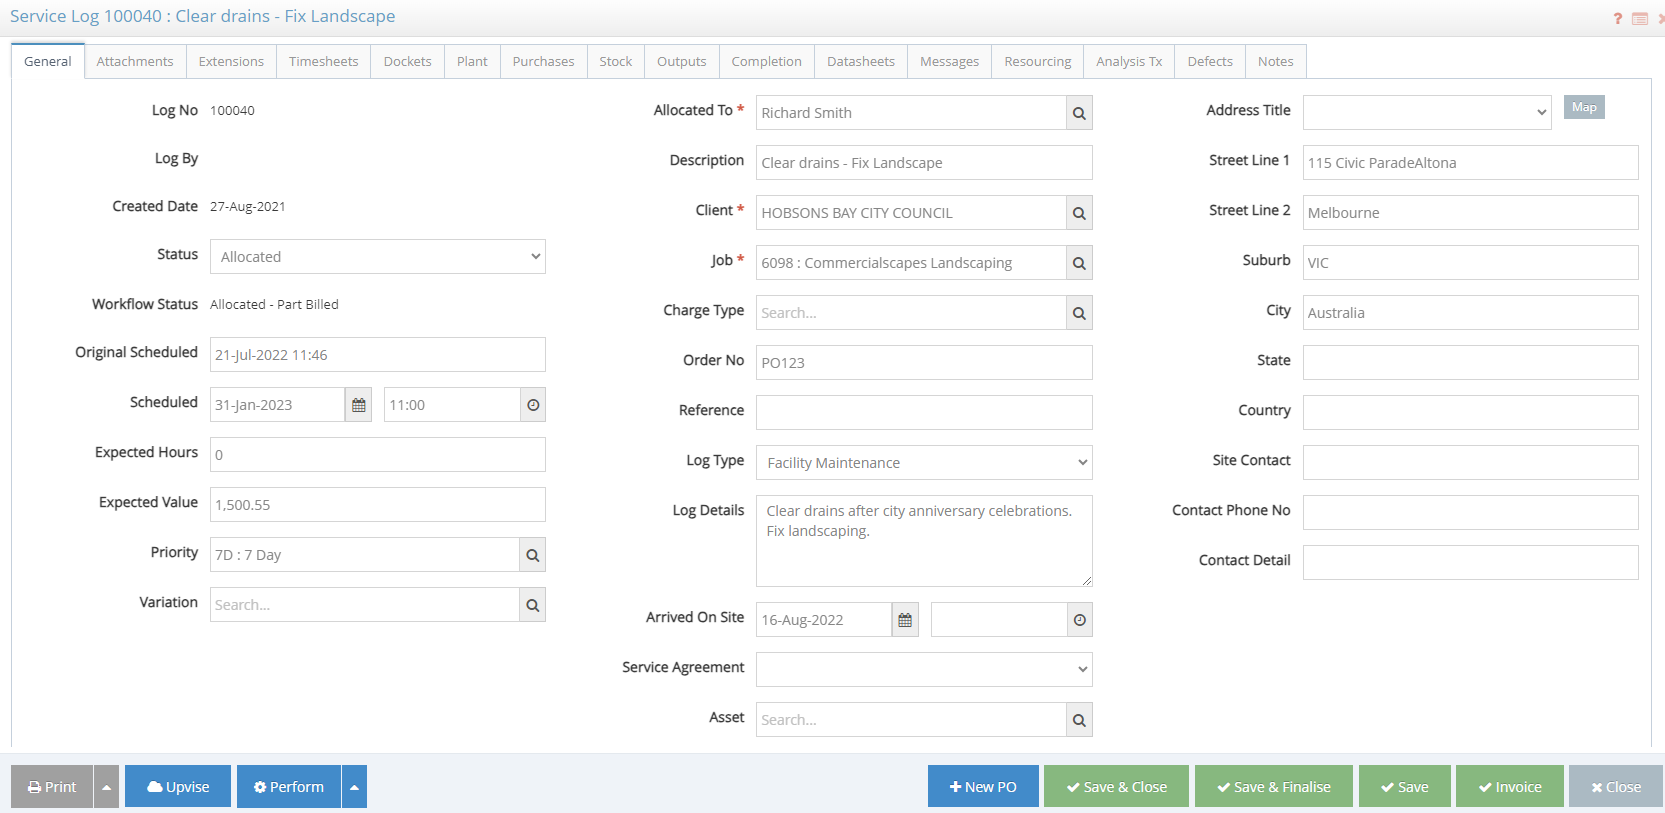
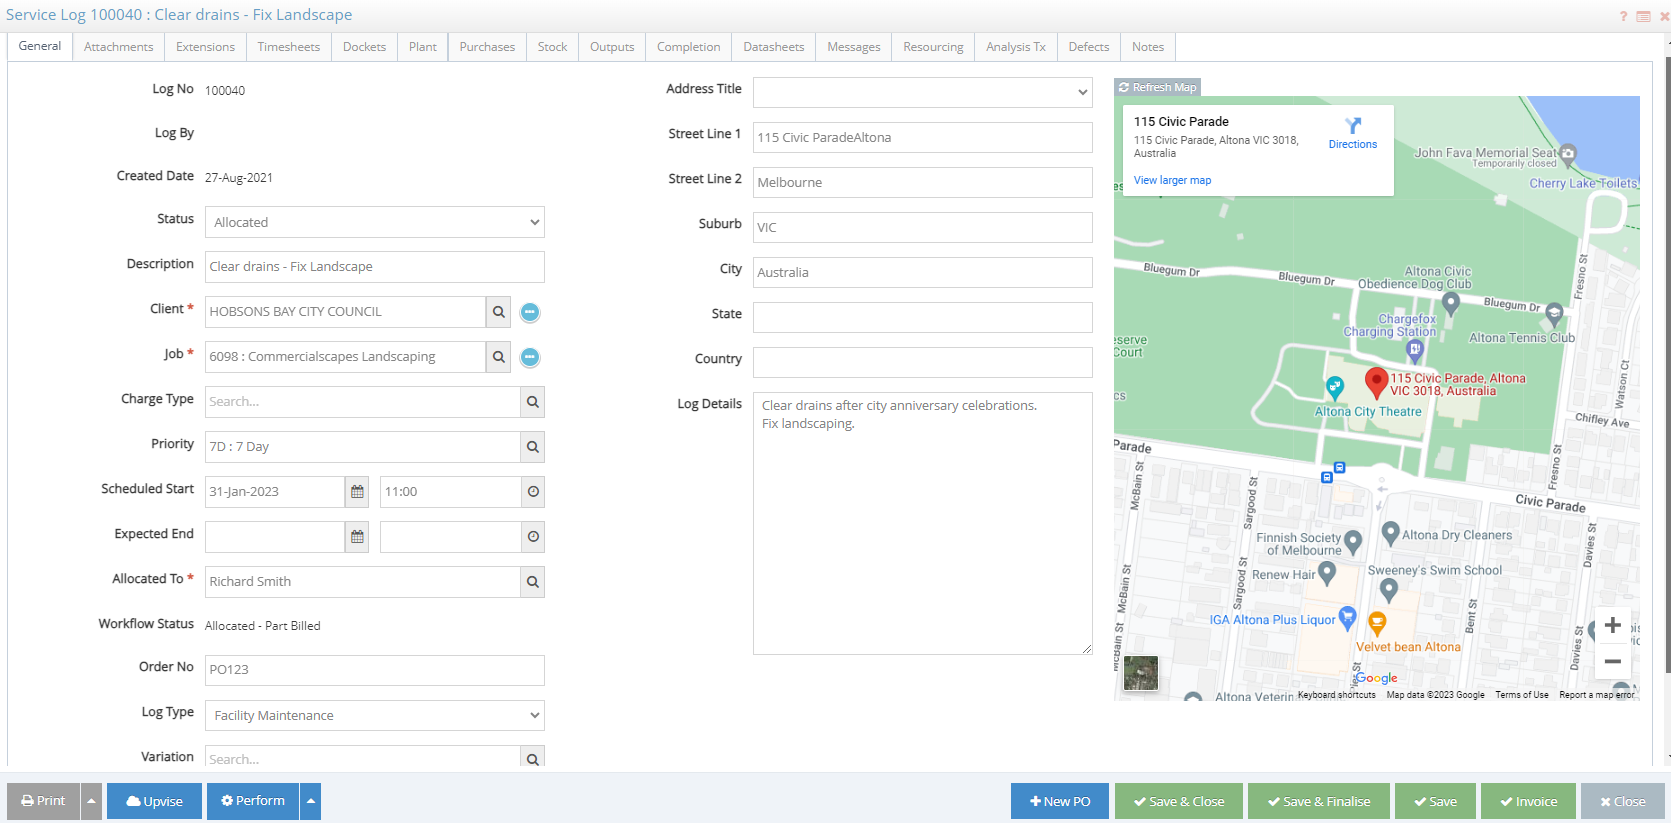
These statuses are displayed in the ‘General tab’ as decribed below.
Screen Guide:
By default, all existing logs are displayed and sorted by On Hand (Hrs) column which is hidden by default on Grid Management. On the [Apply filter] button the option to create a tile can be used to create a shortcut on the home screen with the filters of your choice. Clicking on the Log Number will drill into the Log detail.
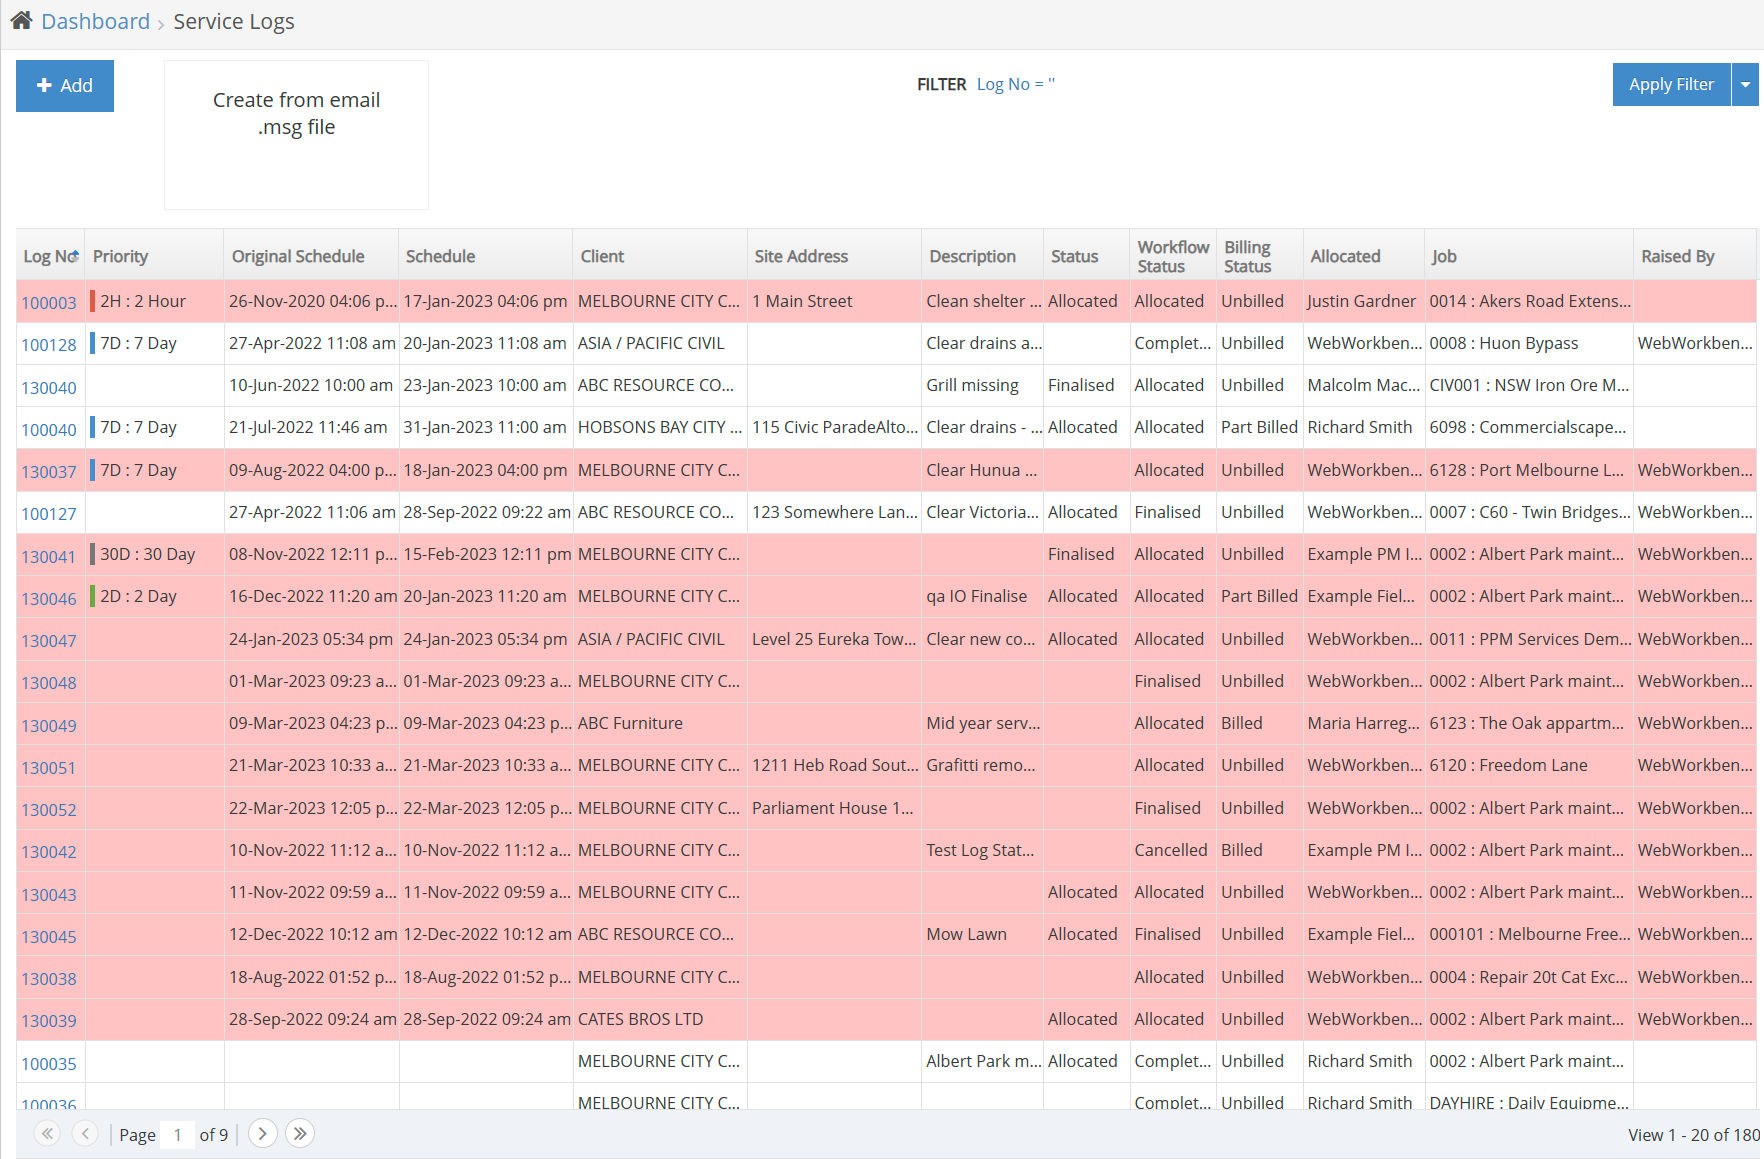
The two colour coding regimes are controlled by the Control Parameter ‘Log Maintenance Colour Coding’:
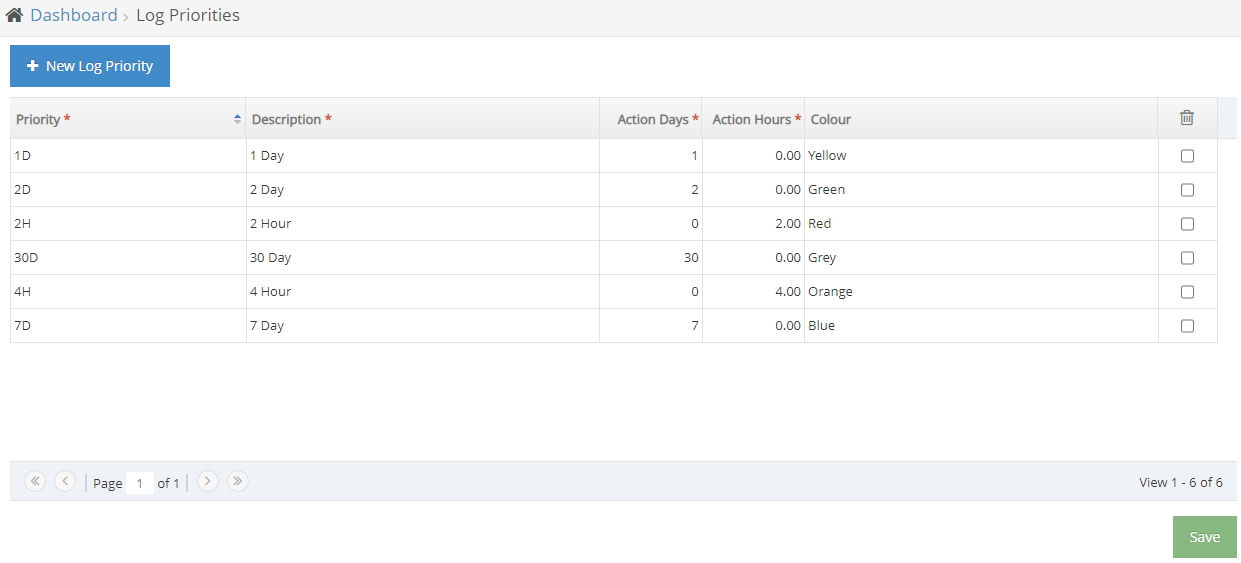
Response Time: the colour is determined by how close to the scheduled date/time the log is (log Scheduled field). The response times specified on the Log Priorities will be used to determine which colour to use. In this scenario, the colour may initially match the priority specified, but as it gets closer to the scheduled date/time the colour will change, but the priority itself will not change.
Once a log has Arrived On Site populated all colour coding is removed.
Priority: the colour is determined by the priority set on the Log, and the colour is defined on Log Priorities table.
Create a new Log
To create a new Log click either:
the [Add] button on the Service Logs screen or
the [Create Planned Logs] within an existing Log.
By default, all available tabs will display on Logs. These can be narrowed down by listing the desired tabs using the setting Log Maintenance Tabs. There are two possible options for the General tab, the standard one and a simplified option called GeneralAlt.
| Info |
|---|
Note:
|
Create new log by drag-drop emails.
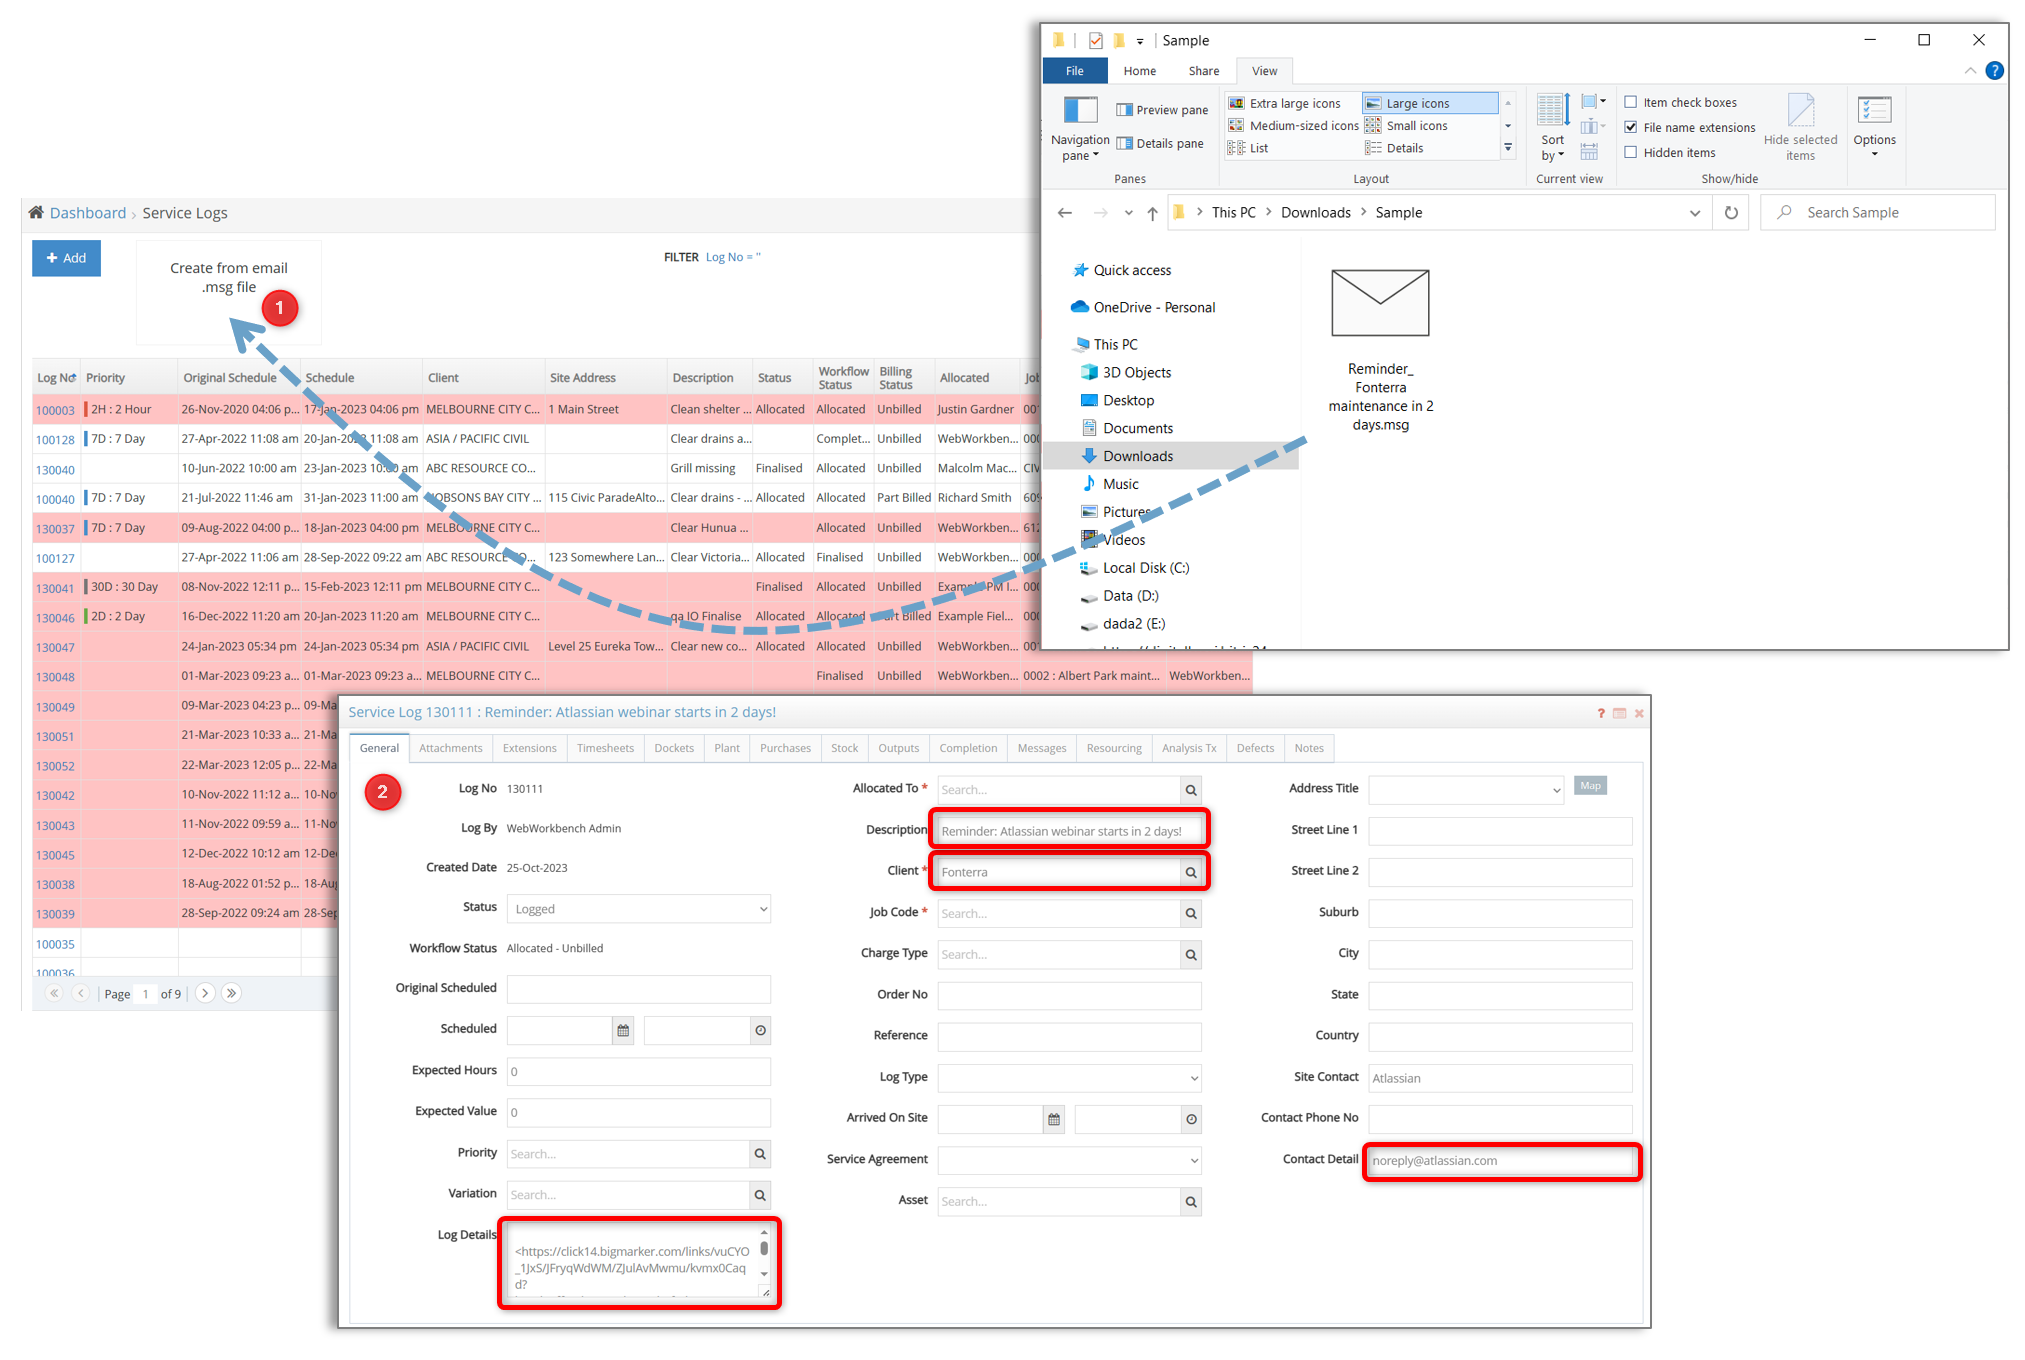
You can also generate a new log by dragging and dropping an email directly from your inbox or a saved email with the .msg extension into the box at the top of the screen. The fields will be auto-filled using the contents of the email:
The company will be derived from the 'From' address of the email.
The 'Description' field will be filled from the email subject.
The log details will be populated from the message body.
Contact details will be filled from the sender email address.
Exporting to Upvise
If the Control Parameter "Export Logs to Upvise" is enabled, when a Log is created from an email, Workbench will sync it to Upvise only once. The corresponding Upvise Job is created, and this becomes the master, which will be synced back to Workbench with updates.
The data mapping is provided in the table below:
Workbench | Upvise |
|---|---|
Description | name |
Comment | note |
City | city |
Country | country |
StreetLine1 | street |
SchdDate and SchdTime | duedate |
JobCode | projectid |
LogDate | creationdate |
LogHeaderID | Log No (custom field) |
Please note that the Comments section is populated with the body of the email and will be trimmed if it exceeds 2000 characters. The email is attached to the Log as an attachment, and if the user requires further details, they can always open the attachment.
Log detail (Tabs)
| Expand | ||||||||||||
|---|---|---|---|---|---|---|---|---|---|---|---|---|
| ||||||||||||
Status is a legacy attribute from Workbench MDE (legacy platform) and Workflow Status is a native attribute from Web Workbench. Status columns can be hidden from the Logs list if it is not necessary. Log Workflow Status & Upvise Job Status: Workbench Logs and Upvise Jobs statuses do not always match 1 to 1. In the Logs List, you can filter using Workbench Workflow Status. There is the option of using the Language Translation feature in Workbench if you want to display the Upvise status equivalent.
|
| Expand | ||
|---|---|---|
| ||
Attachments can be loaded here. Also, any attachments loaded on an Upvise Job or sub-Job linked to this Log will be imported back to Workbench and displayed on this tab. Additionally, all Upvise Forms on the Job or subjobs will be attached to the Workbench log as PDF files. |
| Expand | ||
|---|---|---|
| ||
Use Extension columns to define and capture specific data that is not captured on any other standard fields. Use LogHeader Extension type and create views to group data and display on this tab. Steps to create new custom columns and views below: 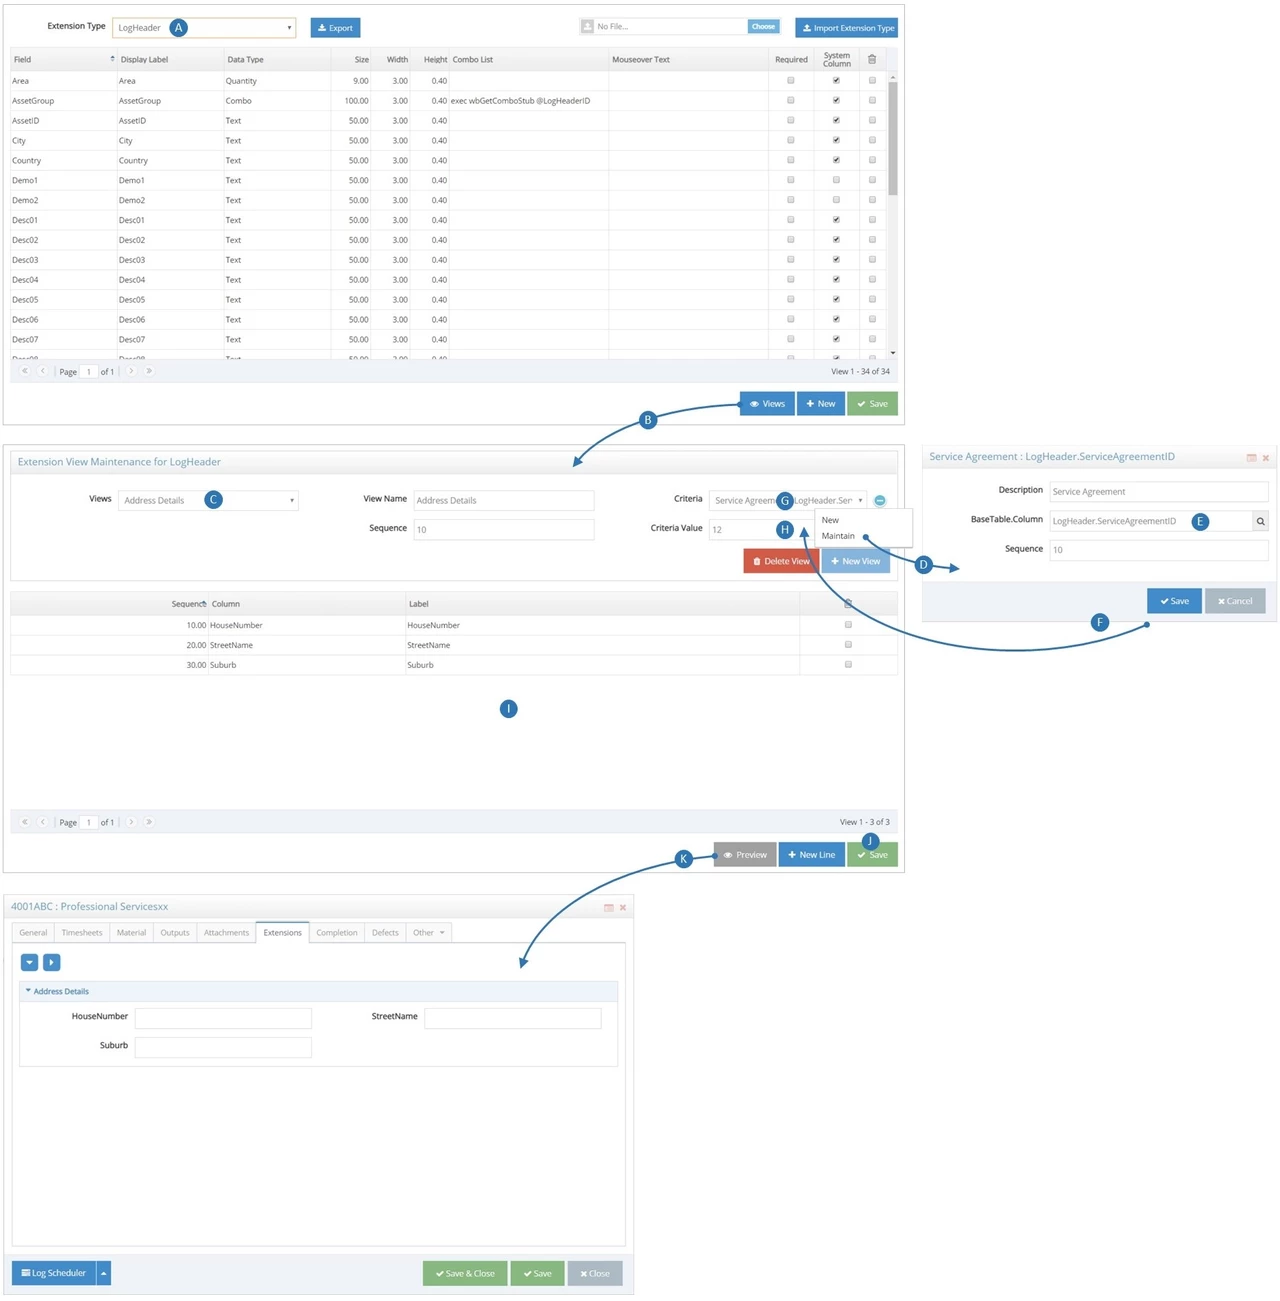 A. From Extension Column screen select the Extension Type to configure. Use LogHeader (i.e. Log Maintenance) for Service Logs. B. Click Views to navigate to Extension Views Maintenance. C. Select the View to edit or create a new view; the example created an 'Address Details' view. D. We assume there are no appropriate Criteria, so we select New from the ellipsis menu. E. The Criteria popup is displayed and we specify the details; specifically LogHeader.ServiceAgreementID as the criterion field. If we want a default section that always displays then define a Criteria of 'Form Default' with no table column selected. F. On save the criteria is available. G. We select our new criteria. H. We specify the Criteria Value for which the view is displayed e.g. an ID value of 12; note this time it is a numeric key, in other instances, it may be a more readable string. I. We specify the fields to display in the view. J. We Save our view configuration. K. Preview will display an example from our data if we have any data meeting the criterion. |
| Expand | ||
|---|---|---|
| ||
 Time can be entered for any employee that worked on this Job. This screen behaves the same way as any of the other Timesheet entry screens (Daysheets, Timesheets). OutputMeasure can be used to indicate the number of Outputs completed by that person in that period of time. This is not to be confused with Job Outputs on the Outputs tab. |
| Expand | ||
|---|---|---|
| ||
 Dockets are designed to capture a variety of bulk supply or external labour items. Dockets provide immediately recognised costs on jobs. To create dockets, the appropriate Docket Cost Schedules must already be created and applied to Job. |
| Expand | ||
|---|---|---|
| ||
 Internal plant issues can be entered here. Only Plant activities are allowed on this tab. The Plant issues are automatically entered in a system-created Plant Issue batch opened for the period. If there is not an opened batch, the system will create a new one. The batch is assigned to the Financial Company of the Plant Item's Profit Centre: Plant → Profit Centre → FinCo. Plant Issues that have been invoiced are ready-only and cannot be edited or deleted. |
| Expand | ||
|---|---|---|
| ||
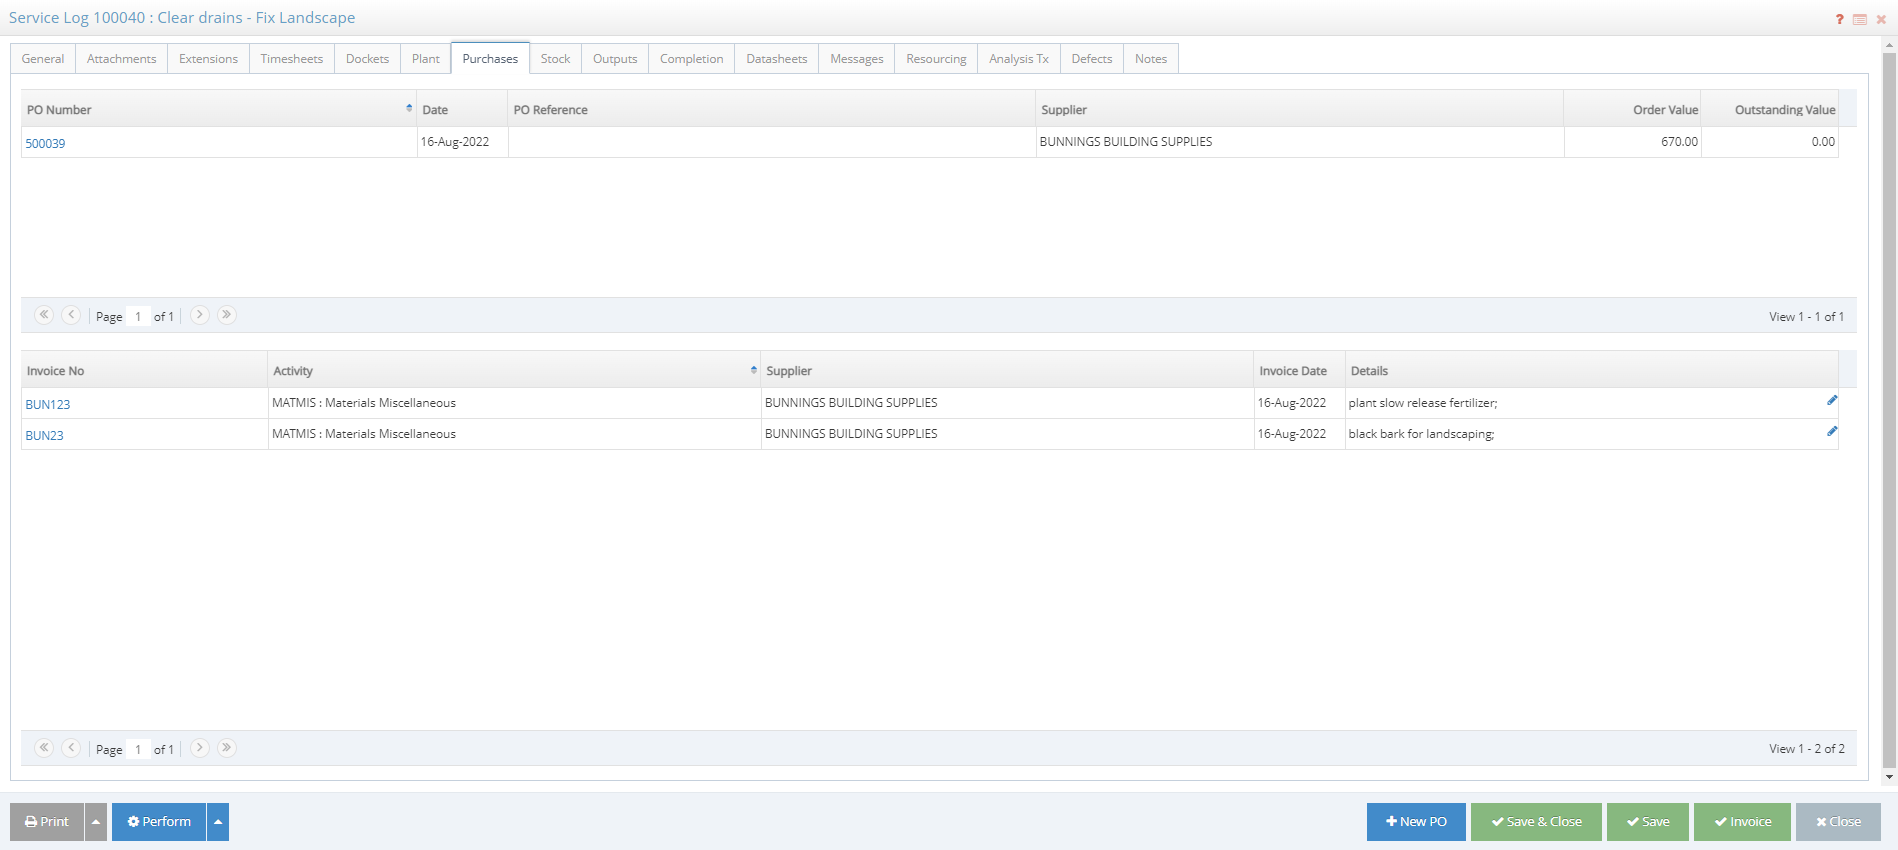 All Purchase Orders created from this Log will be displayed with a direct link to open them to check any further details on these POs. Every AP Invoice line generated from Purchase Orders linked to the Log will be displayed on the bottom section. There is a direct link to each AP Invoice and each PO, which can be used to verify if goods have been receipted. |
| Expand | ||
|---|---|---|
| ||
 This tab allows the user to create Stock issues and Stock returns. The Stock location is defaulted to the Default Stock Location for the ‘Allocated To' person, even if that is is not a valid location for the selected stock item. For Stock issues, the quantity must be a positive number. For Stock returns, the quantity must be a negative number. Stock returns are permitted on a Stock Location where this Stock did not exist before. |
| Expand | ||
|---|---|---|
| ||
Allows entry of Job Outputs against this Log. The allowable Outputs are those in the Schedule(s) attached to the Job Code on the Log. See Log Outputs |
| Expand | ||
|---|---|---|
| ||
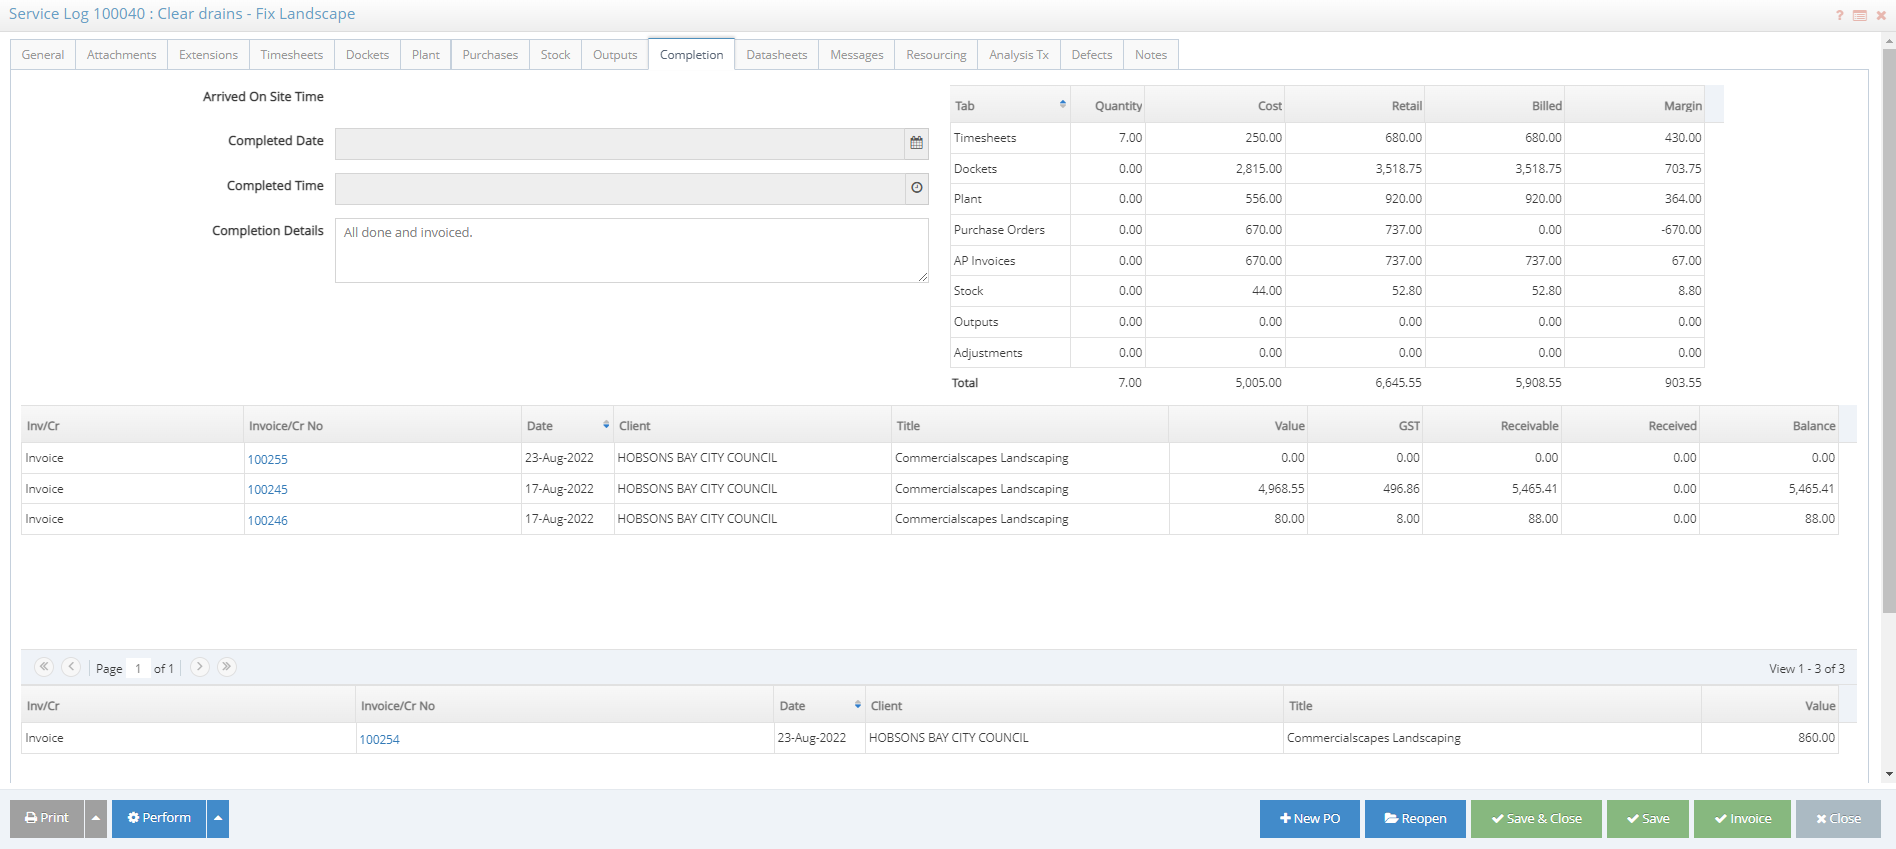 Completed When Completed Date/Time are populated, the Log status will automatically change to Completed, becoming read-only. The comments on Completed Details will become the Job Invoice Comment by default. Financial Summary & Invoices Provides a grid of financial summary of each Tab with - Tab Description, Quantity, Cost, Retail, Billed, and Margin.
This section can be hidden using Control Parameter 'Log Maintenance Retail Values' to Show/Hide retail values for All jobs. The default value for this CP = Yes |
| Expand | ||
|---|---|---|
| ||
 Datasheets can be created directly from a Daysheet. A new datasheet created from here will automatically be linked to the 'Allocated to' user, and linked to the current Log. A new Datasheet can only be created if a Logs Datasheet Template exists. Multiple Datasheets can be created. |
| Expand | ||
|---|---|---|
| ||
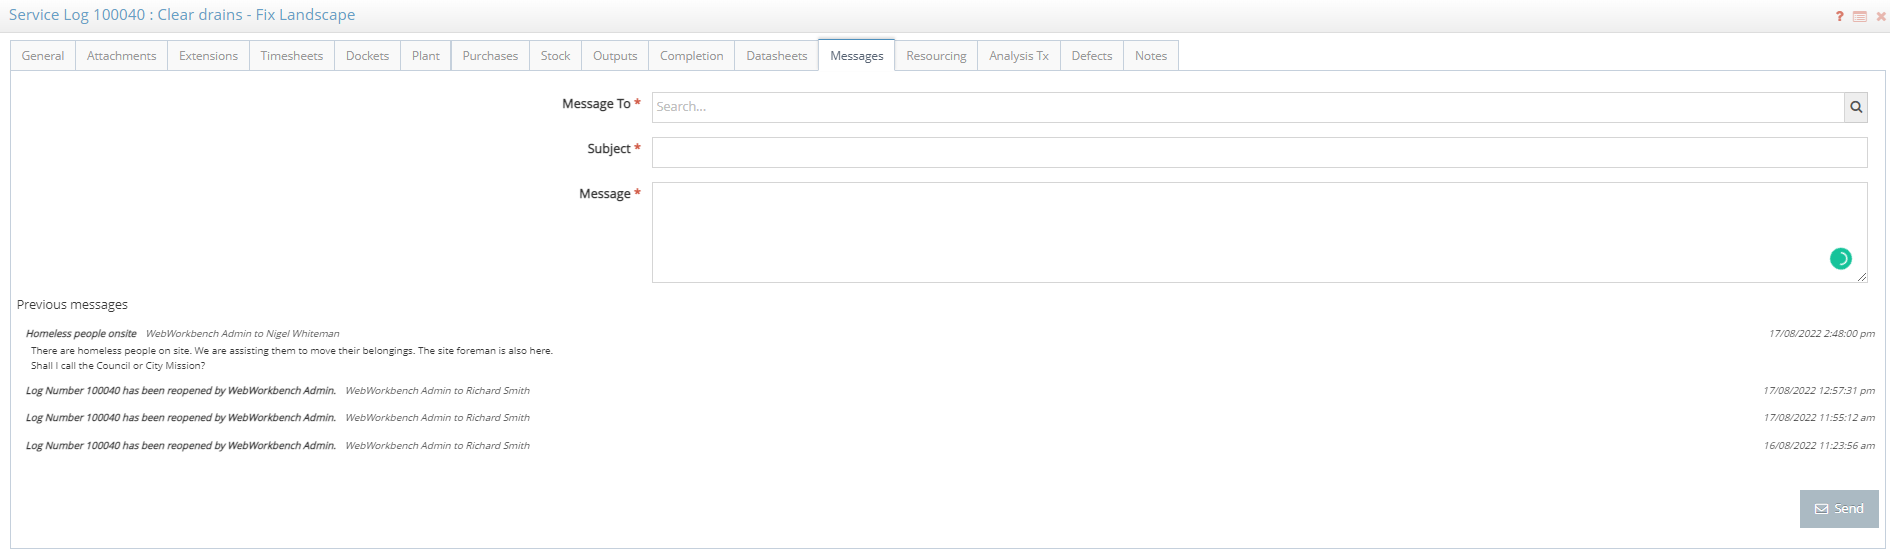 The purpose of this feature is to make communication about the log easy and effective from one single place. Communicate with people involved in this Job, ask for input or inform them about progress or issues. Message history is recorded and available to everyone with access to the Log. Changes in the workflow status are automatically recorded here by the system, with time and date stamp and user name. |
| Expand | ||
|---|---|---|
| ||
 This is a space to plan and schedule the resources required to perform the job. Additionally to the 'Allocated To' person on the main tab, other employees can be scheduled from this tab. The People and Plant scheduled here will also display on People Scheduler and Plant Scheduler. Changes done from the Schedulers will be reflected here and vice-versa. The list of people available will be limited to the availability for the Start and End time entered on the Resourcing line. This functionality is for scheduling purposes only, and not to raise job costs. |
| Expand | ||
|---|---|---|
| ||
Analysis Transactions tab allows work analysis of what was actually done against this Log. Legacy functionality only compatible with Workbench legacy platform (MDE). |
| Expand | ||
|---|---|---|
| ||
This area can be used to capture specific issues related to the Service Log. This could be related to Health & Safety or any issues or events clearly defined in internal procedures. The Defect types can be defined on Metadata Editor, using DefectType Class: 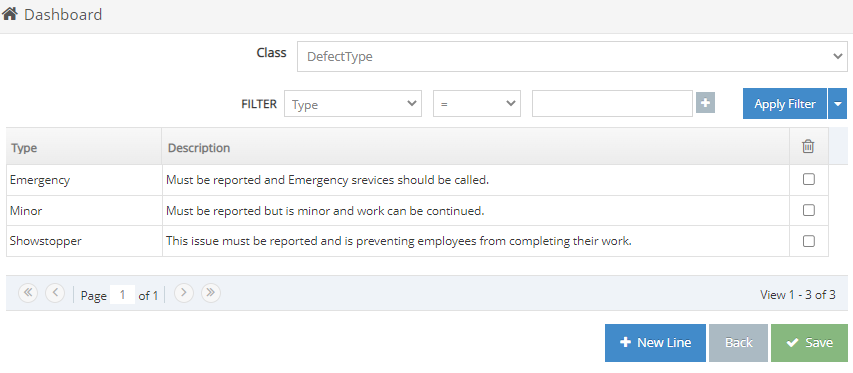 |
| Expand | ||
|---|---|---|
| ||
 Multiple notes can be added. However, this tab is mainly used by the Upvise Job integration, and all Notes from Upvise Jobs and subjobs are appended here with an Upvise note type. |
| Expand | ||
|---|---|---|
| ||

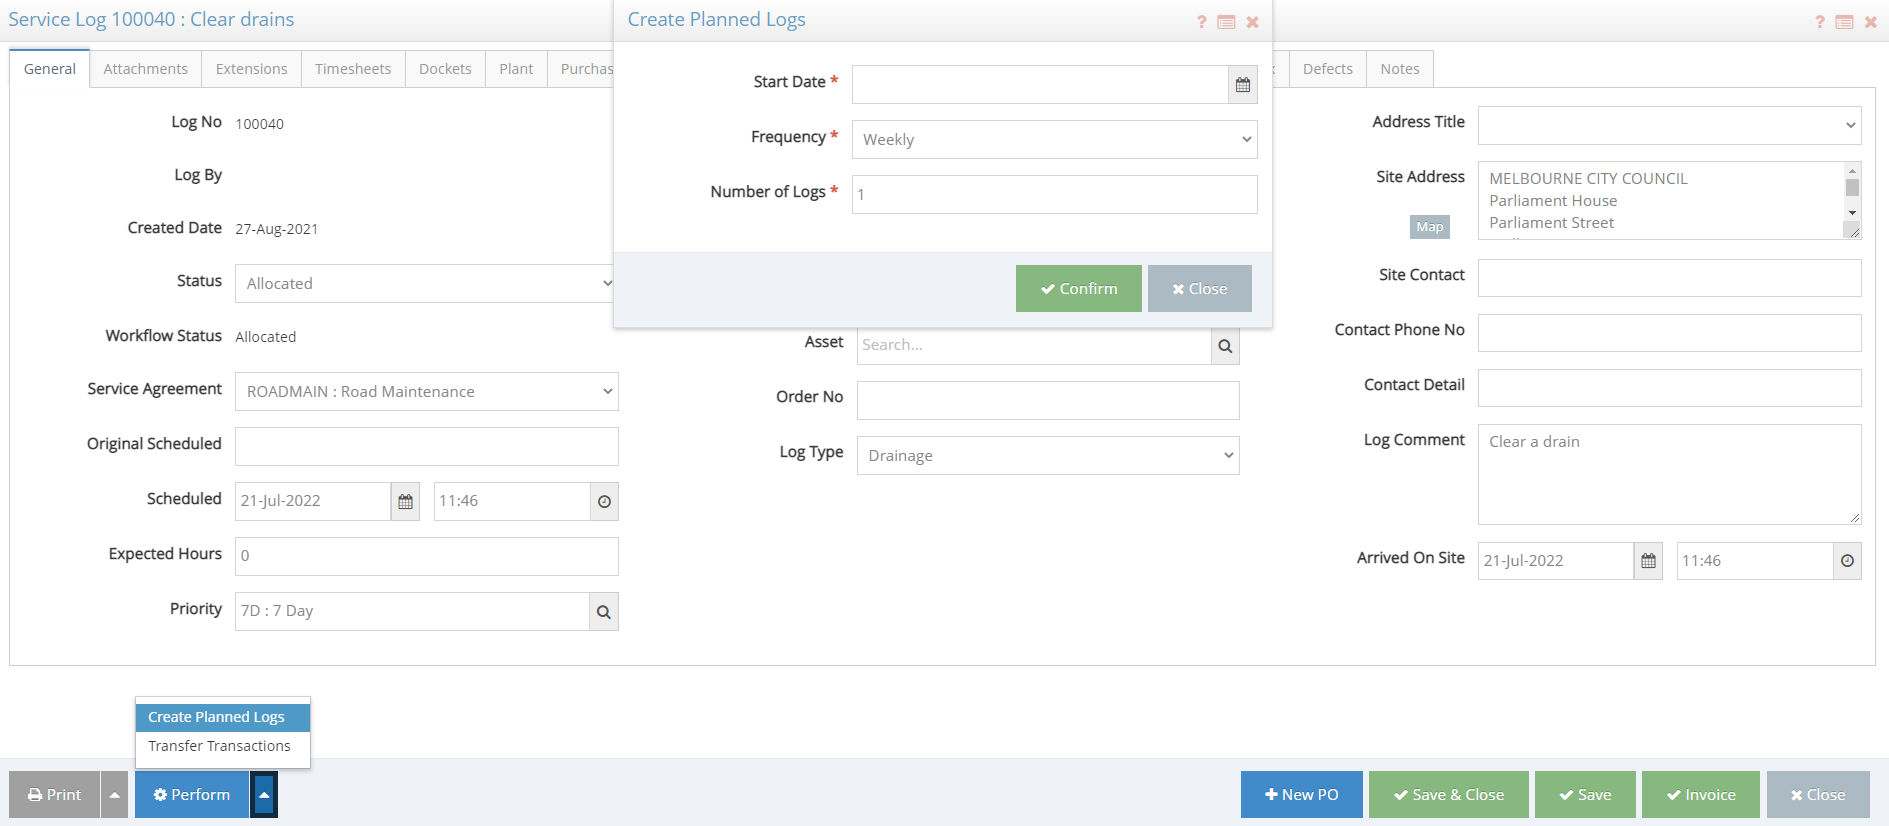 This option allows a user to duplicate an existing Log into one or multiple ones. After clicking on the button a menu opens a popup screen where the following fields can be specified:
On confirmation, a set of new Logs will be created.
|
Invoicing a Log
| Anchor | ||||
|---|---|---|---|---|
|
You can do the billing from the Service Log screen via the button ‘Invoice’ in multiple ways:
Wait until all services are completed and send one invoice at once, or
Bill customers for each activity/transaction as it occurs (invoice incrementally as each activity is completed) by creating invoices before marking the service as 'Finalised.'
Use both methods: bill for each transaction as it happens and, upon completion of the service, send an invoice for any remaining items.
Once an invoice introduced, the process Job Sale Invoice will be applied.
Refer to the Log billing for more details.
| Info |
|---|
Note:
|
Next Steps:
Related Pages:
FAQs:
| Filter by label (Content by label) | ||||||
|---|---|---|---|---|---|---|
|
Process Flow: